# Learn

<figure><img src="/files/arlSRa2MqUfBH0BcE7Fx" alt=""><figcaption></figcaption></figure>

**UOMI** is an interoperable blockchain platform designed for the **Polkadot** and **Ethereum** ecosystems, supporting both **Wasm** and **EVM** smart contracts. This guide will help you quickly get up to speed with the core components of our platform.

Whether you're managing accounts, deploying smart contracts, you'll find all the essential information here to start building with UOMI. Dive into a new era of decentralized, AI-driven economic agents and explore the limitless possibilities of our innovative blockchain ecosystem!


# Architecture

UOMI is a Layer 1 blockchain specialized for:

* Executing all types of smart contracts&#x20;
* Providing a hybrid EVM + Wasm environment with interoperability
* Seamlessly aggregating features and assets within its ecosystem
* Running AI-driven economic agents&#x20;

### Understanding the Architecture

UOMI is built with Substrate, inheriting many of its powerful features, including its account system. At its core, UOMI leverages Substrate's technology stack while operating as an independent Layer 1 blockchain.

#### Core Components

At a high level, a UOMI node provides a layered environment with two main elements:

1. An outer node that handles:
   * Network activity and peer discovery
   * Transaction request management
   * Consensus mechanisms
   * RPC call responses
2. A runtime containing all the business logic for executing the state transition function of the blockchain. For more detailed information, see the [Infrastructure](/readme/infrastructure) and [Security](/readme/security) documentation.

### FRAME

FRAME (Framework for Runtime Aggregation of Modularized Entities) encompasses numerous modules and support libraries that simplify runtime development. In Substrate, these modules (called pallets) offer customizable business logic for different use cases and features that you might want to include in your runtime.

The framework provides pallets for common blockchain functionalities such as:

* Staking
* Consensus
* Governance
* Uomi-engine
* IPFS
* Other core activities

### Smart Contract Execution

UOMI provides a robust environment for smart contract execution through two main Virtual Machine (VM) implementations:

#### Ethereum Virtual Machine (EVM)

The Ethereum Virtual Machine (EVM) is a virtual computer with components that enable network participants to store data and agree on the state of that data. In UOMI, the core responsibilities of the EVM are implemented in the EVM pallet, which is responsible for executing Ethereum contract bytecode written in high-level languages like Solidity. UOMI EVM provides a fully Ethereum Virtual Machine compatible platform, which you can learn more about in the [EVM chapter](/build/evm-smart-contracts).

#### Substrate Virtual Machine for Wasm Contracts

UOMI includes the pallet-contracts module for WebAssembly (Wasm) smart contracts. This implementation supports the execution of Wasm-based smart contracts, providing an alternative to traditional EVM-based contracts. The Wasm environment offers several advantages, including:

* Improved performance
* Enhanced security features
* Greater language flexibility

You can learn more about Wasm contract development in the [Wasm chapter](/build/wasm-smart-contracts).

#### Hybrid Approach

One of UOMI's key features is its hybrid approach to smart contract execution, allowing developers to choose between EVM and Wasm environments based on their specific needs. This flexibility enables:

* Cross-contract interactions between EVM and Wasm
* Optimization of different use cases
* Broader ecosystem compatibility


# Staking


# Staking


# Proof of stake

## Proof of Stake Consensus

### Overview

UOMI blockchain implements a Proof of Stake (PoS) consensus mechanism utilizing BABE (Blind Assignment for Blockchain Extension) for block production. This consensus mechanism provides a secure, energy-efficient, and scalable foundation for the network.

### How It Works

#### Stake-Based Validation

* Validators are selected based on their UOMI token stake in the network
* Higher stakes increase the probability of being chosen to produce blocks
* Participants must meet minimum staking requirements to become validators

#### BABE Block Production

* Utilizes a slot-based block production system
* Random validator selection for each slot using VRF (Verifiable Random Function)
* Ensures predictable block times while maintaining security
* Prevents manipulation through deterministic selection process

### Network Security

#### Economic Security

* Validators must stake tokens as collateral
* Malicious behavior results in stake slashing
* Economic incentives align validator interests with network health

### Benefits

#### Efficiency

* Significantly lower energy consumption compared to Proof of Work
* Faster transaction finality
* Reduced hardware requirements for participation

#### Scalability

* Supports high transaction throughput
* Flexible validator set size
* Efficient block production and validation process

#### Decentralization

* Encourages broad participation through staking
* Democratic validator selection process
* Reduced barriers to entry compared to mining

### Participation

#### Becoming a Validator

* Meet minimum stake requirements
* Run validator node infrastructure
* Maintain high uptime and performance
* Follow network protocols and updates

#### Staking as a Delegate

* Participate in network security without running infrastructure
* Delegate tokens to trusted validators
* Earn proportional rewards from validation activities

This consensus mechanism forms the foundation of UOMI's reliable and efficient blockchain infrastructure, enabling secure operation of AI models and agent interactions while maintaining network decentralization.


# Smart Contracts

### Overview[​](https://docs.astar.network/docs/learn/smart-contracts#overview) <a href="#overview" id="overview"></a>

Developers can create and deploy smart contracts on Uomi Network using various programming languages, including Solidity, compatible with Ethereum smart contracts, and ink!, a Rust-based smart contract language for the Polkadot ecosystem. This compatibility ensures a seamless transition for developers from other blockchain ecosystems, fostering interoperability and encouraging the adoption of the Uomi Network.

### WebAssembly smart contracts[​](https://docs.astar.network/docs/learn/smart-contracts#webassembly-smart-contracts) <a href="#webassembly-smart-contracts" id="webassembly-smart-contracts"></a>

Uomi runtimes are based on Substrate and incorporate `pallet-contracts`, a sandboxed environment used to deploy and execute WebAssembly (Wasm) smart contracts. Any language that compiles to Wasm can be deployed and run on this Wasm Virtual Machine, provided the code is compatible with the `pallet-contracts` [API](https://docs.rs/pallet-contracts/latest/pallet_contracts/api_doc/trait.Current.html).

To avoid unnecessary complexity and writing boilerplate code, the most appropriate method of building involves the use of an eDSL specifically targeting `pallet-contracts`, such as ink! (based on Rust) or ask! (based on AssemblyScript), among others as the ecosystem grows.&#x20;

After compilation, a Wasm blob can be deployed and stored on-chain.

### Ethereum Virtual Machine smart contracts[​](https://docs.astar.network/docs/learn/smart-contracts#ethereum-virtual-machine-smart-contracts) <a href="#ethereum-virtual-machine-smart-contracts" id="ethereum-virtual-machine-smart-contracts"></a>

The Uomi EVM implementation is based on the Substrate Pallet-EVM, providing a full Rust-based EVM implementation. Smart contracts on Uomi EVM can be implemented using Solidity, Vyper, or any other language capable of compiling smart contracts to EVM-compatible bytecode. Pallet-EVM aims to provide a low-friction and secure environment for the development, testing, and execution of smart contracts that is compatible with the existing Ethereum developer toolchain.


# Accounts

### Overview <a href="#overview" id="overview"></a>

A Uomi Network account is composed of a private key and a public key. The public key, often referred to as the account address, is publicly accessible. The private key, on the other hand, is essential for accessing and managing the associated account. While anyone can send tokens to your public address, only the holder of the private key can access and control those tokens. Consequently, safeguarding your private key is of utmost importance.

Uomi Network is compatible with two types of virtual machines, Wasm VM and EVM, and thus employs two different account formats.

### Substrate Accounts <a href="#substrate-accounts" id="substrate-accounts"></a>

Uomi is developed using Substrate, a framework for building blockchains, and it utilizes Substrate accounts. In Substrate-based chains, the public key is used to derive one or more public addresses. Instead of directly using the public key, Substrate enables the generation of multiple addresses and address formats for an account. This means that a single public-private key pair can be used to derive various addresses for different Substrate chains.

The private key is a cryptographically secure sequence of randomly generated numbers. For easier human readability, the private key can generate a random sequence of words known as a secret seed phrase or mnemonic.

Substrate-based chains, including Uomi, use the ss58 address format. This format is a variant of Bitcoin's Base-58-check, with some modifications. Notably, ss58 includes an address type prefix to identify the address as belonging to a specific network.

### EVM Accounts <a href="#evm-accounts" id="evm-accounts"></a>

On the Uomi EVM side, Ethereum-style addresses (H160 format) are supported within the Substrate-based chain. These addresses are 42 hex characters long. Each Ethereum-style address corresponds to a private key, which can be used to sign transactions on the Ethereum side of the chain. Additionally, these addresses are mapped to a storage slot within the Substrate Balance pallet, linking them to Substrate-style addresses (H256 format).


# Infrastructure

The **UOMI** infrastructure is the backbone of our platform, designed to support the seamless integration of AI-driven agents within a decentralized blockchain environment. This section provides an overview of the key components that power UOMI, enabling robust, secure, and efficient operations for AI models and agents.

Explore how **Nodes** execute AI computations, delve into the various **Models** utilized—ranging from large language models (LLMs) to image generation frameworks—and discover how **IPFS** facilitates decentralized storage. Additionally, learn about the role of **Agents** in driving autonomous, intelligent economic interactions across the UOMI ecosystem.

## Key Participants

The success of the UOMI platform relies on the contributions of several key participants:

* **Developer**: The individual responsible for developing and deploying AI-AGENTS, bringing intelligence and functionality to the platform.
* **Staker**: Provides the hardware required to run the blockchain nodes, ensuring the stability and performance of the network.
* **Delegator/Nominator**: Supplies tokens to support and secure **Staker**, helping to maintain the network’s integrity.
* **User**: Uses the blockchain to run AI-AGENTS, benefiting from the decentralized, AI-powered services that UOMI enables.

Together, these participants contribute to building a robust, scalable, and interoperable ecosystem that pushes the boundaries of decentralized AI applications.


# Nodes

### Overview

Nodes are fundamental components of the UOMI ecosystem, serving multiple critical functions including blockchain maintenance, AI computation execution, and system-wide service integration. Each node type is optimized for specific roles within the network architecture.

<figure><img src="/files/Ou4XF5ZODLuZh5dYpFZL" alt=""><figcaption></figcaption></figure>

### Node Types

#### Full Node

* **Core Functions:**
  * Maintains complete blockchain copy
  * Performs comprehensive transaction verification
  * Facilitates network transaction propagation
  * Supports network stability and decentralization

#### Archive Node

* **Key Features:**
  * Stores complete historical state
  * Enables historical block queries
  * Supports data analytics and explorers
  * Maintains network transparency

#### Validator Node

* **Capabilities:**
  * Operates full node functionality
  * Participates in consensus
  * Implements intelligent state pruning
  * Optimizes storage efficiency
  * Executes Agents

### MainNet Service Architecture

#### Core Components

1. **Uomi-node Service**
   * Substrate-based blockchain runtime
   * Transaction processing engine
   * State management system
   * Network communication protocol
2. **AI Service**
   * Dedicated computation engine
   * Model execution environment
   * Agent interaction interface
   * Resource management system

#### Integration Layer

The AI-AGENT system interfaces with node services through:

* Secure proxy functions
* Protected communication channels
* Resource allocation controls

### Technical Specifications

#### Hardware Requirements

| Node Type | CPU      | RAM   | Storage | Network | GPU           |
| --------- | -------- | ----- | ------- | ------- | ------------- |
| Full      | 4+ cores | 8GB+  | 100GB+  | 1 Gbps  | -             |
| Archive   | 8+ cores | 16GB+ | 500GB+  | 1 Gbps  | -             |
| Validator | 8+ cores | 16GB+ | 100GB+  | 1 Gbps  | 2 x RTX 4090+ |

#### Network Parameters

* Default P2P port: 30333
* Default RPC port: 9944
* Default WS port: 9944
* Default Prometheus port: 9615

### Security Considerations

1. **Network Security**
   * Firewall configuration
   * Port access control
   * DDoS protection
   * Secure communication protocols
2. **System Security**
   * Regular updates
   * Access control
   * Resource isolation
   * Monitoring and alerting
3. **Data Security**
   * State encryption
   * Secure key management
   * Backup procedures
   * Recovery protocols

### Best Practices

1. **Deployment**
   * Use dedicated hardware
   * Implement monitoring
   * Regular maintenance
   * Performance optimization
2. **Operation**
   * Regular backups
   * Update management
   * Resource monitoring
   * Performance tuning
3. **Maintenance**
   * Regular updates
   * Security patches
   * Performance monitoring
   * Capacity planning

This comprehensive guide provides the foundation for understanding and implementing UOMI network nodes. For specific setup instructions, refer to our node deployment documentation.


# Agents

Agents are a core concept within the UOMI blockchain, representing autonomous entities that perform operations directly on the network. These agents are designed to leverage AI models to process data, execute computations, and interact with the blockchain ecosystem seamlessly. By integrating intelligent behavior with decentralized technology, agents become powerful tools capable of executing complex tasks efficiently.

An agent’s role extends beyond computation. It has the capability to trigger transactions on the blockchain, enabling it to manage digital assets, interact with smart contracts, and coordinate activities within the decentralized environment. This level of autonomy allows agents to operate as independent entities, driving the execution of on-chain operations without requiring constant human intervention.

Agents are tightly integrated into the UOMI infrastructure, functioning as the active participants that bridge AI capabilities with blockchain processes. They embody the intelligence of the network, processing inputs deterministically to ensure consistency across all nodes. By combining autonomy, intelligence, and decentralization, agents play a pivotal role in realizing UOMI’s vision of an AI-powered blockchain ecosystem.


# Models

### Overview

AI Models are a fundamental component of the UOMI blockchain infrastructure, enabling the execution of complex operations that power the entire ecosystem. These models encompass a wide variety of architectures supporting different tasks, including:

* Natural language processing
* Image generation
* Data analysis
* Other AI-driven applications

### Integration and Features

The direct integration of AI models into the chain's infrastructure provides a seamless platform for autonomous and intelligent computations. Key features include:

* **Open Source**: The models used within the UOMI ecosystem are primarily open-source, ensuring transparency and adaptability.
* **Deterministic Execution**: To maintain consistency across the network, models are managed deterministically, ensuring that every node:
  * Processes the same input data
  * Produces identical outputs
* **Guaranteed Reliability**: This approach ensures reliability and trust in the operations performed by agents.

### Role in the Ecosystem

AI models in UOMI are responsible for driving the intelligence behind agent interactions. Their role includes:

* Processing input data
* Generating meaningful outputs
* Performing necessary computations for on-chain operations

This tight integration between AI and blockchain creates a robust environment where autonomous agents can operate effectively, leveraging the power of advanced AI technologies across diverse use cases.


# IPFS

IPFS (InterPlanetary File System) serves as the decentralized file system for the UOMI blockchain. It is an integral component of the platform, enabling seamless storage and retrieval of files required for the execution of AI operations.

* **Decentralized Storage**: IPFS ensures that files are stored in a distributed network, eliminating single points of failure and improving data availability.
* **Efficient File Access**: AI agents require access to various files, including models and data inputs, to perform their computations. IPFS provides a robust mechanism to store and retrieve these files securely.
* **Integration with UOMI**: The UOMI blockchain integrates IPFS to handle files referenced by smart contracts and agents, ensuring that essential data is accessible and verifiable throughout the network.

IPFS acts as the backbone for managing the data lifecycle of AI models and inputs used by agents. By leveraging IPFS, the UOMI blockchain ensures seamless access to files for computations while maintaining their immutability to preserve data integrity. Additionally, the distributed nature of IPFS optimizes performance by efficiently spreading data across the network.


# Security

Security is a fundamental aspect of the **UOMI** platform, designed to safeguard the integrity and reliability of its decentralized ecosystem. This section introduces the core security principles and mechanisms that ensure the platform's resilience against potential threats.

Through innovative technologies and protocols, UOMI addresses critical areas such as computation, data integrity, and Model updates Integrity, laying a solid foundation for a secure and trustworthy environment. Explore how these robust security measures work together to protect the platform and its participants.


# OPOC

OPOC, or Optimistic Proof of Computation, is a mechanism designed to ensure the integrity and security of computational operations that occur outside the blockchain (offchain). This approach leverages both offchain and onchain elements to provide a tamper-proof system where certain operations are validated by multiple nodes to achieve consensus.

## Key Concepts

* **Offchain Operations**: These are processes that occur outside the blockchain environment. While they offer scalability and speed, they are susceptible to tampering by malicious nodes.
* **Onchain Operations**: These are processes executed directly on the blockchain, ensuring tamper-proof and immutable records.

## How OPOC Works

1. **User Interaction**
   * A user initiates a request by calling a function in a Solidity contract, providing necessary parameters such as `NFT_ID`, `INPUT_DATA`, and `INPUT_FILE_CID`.
2. **Request Initialization**
   * The contract generates a unique `REQUEST_ID` and invokes a specific function from a precompiled contract, passing critical parameters like `REQUEST_ID` and the other user parameters.
3. **Data Verification**
   * The system checks the input data and retrieves associated NFT information.
   * It stores the request details in the `Inputs` storage and logs an event indicating the request has been accepted.
4. **Consensus Levels**
   * Depending on the NFT specifications, the system start the assignment of the execution to a random node.

## Security Mechanisms

### **During Block Validation:**

* **Wasm and IPFS File Verification**:
  * The system ensures the availability and validity of files required for the execution (the wasm of the AI Agent and the input file).
  * It checks the status of these files through the IPFS pallet, verifying their usability and expiration.
* **Node Assignment and Execution**:
  * Nodes are assigned to process requests based on current load and execution requirements.
  * The system monitors the execution and consensus among nodes, escalating to higher levels of OPOC if discrepancies arise.

### **Consensus Verification:**

* **Level 0**: A single node executes the request.
* **Level 1**: Multiple nodes are involved to achieve a higher consensus.
* **Level 2**: Additional nodes are engaged if discrepancies are found, ensuring a majority consensus.

### Request Completion and Rewards

* The final result is stored in the `Outputs` storage.
* Nodes are rewarded based on their participation and accuracy, with penalties for nodes in the `OpocBlacklist` or those with timeouts and errors.

### Offchain Worker Execution

* Nodes continually monitor and execute assigned tasks, ensuring timely processing and consensus.
* Results are stored, and timeouts are managed to maintain system efficiency.


# TSS

TSS, or Threshold Signature Scheme, is a cryptographic protocol that enables a group of nodes to collaboratively generate a shared signature. This scheme ensures that the resulting signature is valid only if a predefined number of nodes (known as the threshold) participate in the signing process.

## Key Concepts

* **Shared Public Key**: The group of nodes collectively holds a shared public key.
* **Private Keys**: Each node possesses its own private key, which is used in the signature generation process.
* **Threshold**: A predefined number of nodes must participate in generating the signature. If the number of participating nodes meets or exceeds this threshold, the signature is considered valid.

## How TSS Works

1. **Initialization**:
   * A shared public key is established for the group.
   * Each node generates its private key, which remains secret.
2. **Signature Generation**:
   * When a transaction or message requires signing, nodes collaborate by using their private keys.
   * The signature is only produced if the number of contributing nodes meets the threshold.
3. **Validation**:
   * The generated signature can be verified using the shared public key.
   * This ensures that the signature is authentic and originates from the group.

In the UOMI blockchain, TSS is integrated to provide agents with their own wallets. This allows agents to perform onchain transactions during their execution. The use of TSS enhances security and ensures that transactions are only authorized when a sufficient number of agents agree, thus maintaining the integrity of the process.


# IPFS Integrity

### Overview

The IPFS pallet provides decentralized storage capabilities to the blockchain through integration with the InterPlanetary File System (IPFS). It manages pinning, unpinning, and retrieval of files while ensuring data persistence and availability through validator consensus.

### Key Features

#### Pinning System

* **Persistent Pins**: Files that remain pinned indefinitely
* **Temporary Pins**: Files with an expiration block number
* **Validator-based Consensus**: Content becomes available when pinned by majority of validators

#### Pin Types

**Agent Pins**

* Permanent pins associated with NFT IDs
* Used for storing agent-related data
* Can be updated with new CIDs

**Temporary Pins**

* Time-limited storage
* Minimum duration of 28,800 blocks (approximately 1 day)
* Automatically unpinned after expiration

### Core Mechanisms

#### Consensus Process

1. **Validator Pinning**:
   * Validators run offchain workers to process pin requests
   * Each validator maintains its own IPFS node
   * Files become "usable" when pinned by majority (50% + 1) of validators

#### Pin Lifecycle

1. **Pin Request**:
   * User submits CID for pinning
   * System records pin request with expiration time
2. **Processing**:
   * Offchain workers detect new pin requests
   * Validators attempt to pin the content
   * System tracks pinning status per validator
3. **Activation**:
   * Content becomes "usable" once majority threshold is reached
   * System updates UsableFromBlockNumber to avoid using the file on requests received on the chain before the availability of the file
4. **Expiration**:
   * System tracks expiration through ExpirationBlockNumber
   * Automatic cleanup of expired pins
   * Validators remove expired content

### Storage Management

#### Key Storage Items

```rust
NodesPins: (CID, AccountId) => bool
AgentsPins: NFTId => CID
CidsStatus: CID => (ExpirationBlockNumber, UsableFromBlockNumber)
```

#### Status Tracking

* **ExpirationBlockNumber**: When the pin expires (0 for permanent pins)
* **UsableFromBlockNumber**: When content becomes available (post-majority pinning)

### Operations

#### Pin File

```rust
pin_file(origin, cid: CID, duration: BlockNumber)
```

* Requires minimum duration (28,800 blocks)
* Creates temporary pin with expiration
* Triggers validator pinning process

#### Pin Agent

```rust
pin_agent(origin, cid: CID, nft_id: NFTId)
```

* Creates permanent pin associated with NFT
* Updates existing pins if necessary
* Maintains single CID per NFT ID

#### Get File

```rust
get_file(cid: CID) => Result<Vec<u8>>
```

* Checks pin status and expiration
* Verifies content is "usable"
* Returns file content if available

### Block Processing

#### Inherent Data

* Each block processes pin operations
* Updates usable content status
* Removes expired pins
* Updates pin status based on validator consensus

#### Offchain Worker

* Runs after each block
* Processes pending pin requests
* Updates local IPFS node
* Submits pin status updates


# Model Updates Integrity

The **Model Updates Integrity** system ensures seamless and secure transitions between different AI model versions, maintaining the reliability of AI operations across the UOMI network. This process is critical for guaranteeing that AI agents run the appropriate model versions during updates, thereby safeguarding the consistency and accuracy of computations.

## Key Components

#### On-Chain Storage

Two key on-chain storages are utilized to manage model updates:

1. **AiModels**:
   * Stores the list of valid AI models that agents can utilize.
   * Each model is identified by a unique `UOMI_KEY` and includes:
     * **LOCAL\_NAME**: The actual model name installed on the nodes (e.g., `llama-2.0.0`).
     * **USABLE\_FROM\_BLOCK\_NUMBER**: The block number from which the model becomes usable.
     * **OLD\_LOCAL\_NAME**: The previous version of the model used before the update.
2. **NodesVersions**:
   * Contains the version details of each node.
   * Nodes periodically update this storage with their current version via the `offchain_worker`.

## Update Process

During the update process, the system ensures that nodes and agents operate on consistent model versions:

1. **Version Identification**:
   * At each block validation or after a set number of blocks, nodes identify the version used by the majority by reading from `NodesVersions`.
2. **Model Transition**:
   * The active model for the majority is recorded in `AiModels` with the corresponding `LOCAL_NAME`, `USABLE_FROM_BLOCK_NUMBER`, and `OLD_LOCAL_NAME`.
   * This allows for a smooth transition where agents can continue using the older model until the majority has switched to the new version.

## Practical Example

1. **Block 15**: A request is added to the chain.
2. **Block 16**: The initial phase of computation begins, using model `llama-2.0.0`. The validator updates `AiModels` to switch to `llama-2.1.0` from block 16, keeping `llama-2.0.0` as the old model.
3. **Block 18**: The computation continues using the older model for requests initiated before block 16.
4. **Block 20**: New requests use the updated model `llama-2.1.0`, as the transition has been completed.

### Transition Handling

Nodes must be capable of running both the old and new models during transitions to ensure uninterrupted service and accuracy. This dual compatibility is essential to maintain consistent operations throughout the network update process.


# Fees

## Transaction Fees in UOMI

### Overview

UOMI implements a dual fee system to support both native Substrate transactions and Ethereum-compatible operations. This hybrid approach ensures efficient resource allocation and network stability while maintaining compatibility with both ecosystems.

<figure><img src="/files/su7lDhi7SOVvpU91vmms" alt=""><figcaption></figcaption></figure>

### Native Transaction Fees

#### Fee Components

The native fee calculation follows the standard Substrate model:

```
Fee = Length Fee + Base Fee + (Weight Fee × Adjustment) + Tip
```

Where:

* **Length Fee**: Proportional to transaction byte size
* **Base Fee**: Fixed cost per transaction
* **Weight Fee**: Computational resources cost
* **Adjustment**: Dynamic scaling factor based on network congestion
* **Tip**: Optional priority payment

#### Implementation Details

The fee adjustment mechanism ensures network stability by:

* Scaling fees based on block space utilization
* Implementing surge pricing during high congestion
* Maintaining predictable base costs for standard operations

### Ethereum-Compatible Fees

#### Dynamic Fee Model

Based on the provided pallet code, UOMI implements EIP-1559 style fee calculation:

```
Fee = Gas Used × (Base Fee Per Gas + Priority Fee Per Gas)
```

#### Key Features

1. **Base Fee Adjustment**:

```rust
let weight_used = Permill::from_rational(
    weight.total().ref_time(), 
    max_weight.ref_time()
).clamp(lower, upper);
```

2. **Elasticity Mechanism**:

* Adjusts base fee according to block utilization
* Implements upper and lower bounds
* Maintains target block utilization

#### Technical Implementation

The base fee adjusts according to network conditions:

```rust
if usage > target {
    // Increase base fee when above target utilization
    let coef = Permill::from_parts(
        (usage.deconstruct() - target.deconstruct()) * 2u32
    );
} else if usage < target {
    // Decrease base fee when below target utilization
    let coef = Permill::from_parts(
        (target.deconstruct() - usage.deconstruct()) * 2u32
    );
}
```

### Fee Market Dynamics

#### Network Congestion Response

* Fees automatically adjust based on block fullness
* Target block utilization maintained through elasticity
* Smooth fee transitions prevent sudden spikes

#### Economic Incentives

1. **For Users**:
   * Predictable base fees
   * Optional priority fees for faster inclusion
   * Protection against fee spikes
2. **For Validators**:
   * Stable reward structure
   * Additional incentives during high demand
   * Protection against spam attacks


# Finney Testnet RPC Endpoints

### Overview

The Finney testnet provides robust infrastructure through two dedicated RPC (Remote Procedure Call) endpoints. These endpoints serve as archive nodes, offering developers and users comprehensive access to the network's historical data and current state.

### Available Endpoints

<table><thead><tr><th width="286">Endpoint</th><th>Type</th><th>Status</th></tr></thead><tbody><tr><td><code>https://finney.uomi.ai</code></td><td>Primary Archive Node</td><td>Active</td></tr><tr><td><code>https://finney2.uomi.ai</code></td><td>Secondary Archive Node</td><td>Active</td></tr></tbody></table>

### Features

#### Archive Node Functionality

* Complete historical state access
* Full block history from genesis
* State queries at any block height
* Transaction receipt retrieval for all historical transactions

#### Supported Methods

Both endpoints support the standard JSON-RPC methods including:

* Ethereum JSON-RPC API (eth\_\*)
* Net API (net\_\*)
* Web3 API (web3\_\*)
* Debug API (debug\_\*)

### Usage Examples

#### Connecting with Web3.js

```javascript
const Web3 = require('web3');
const web3 = new Web3('https://finney.uomi.ai');
```

#### Connecting with Ethers.js

```javascript
const { ethers } = require('ethers');
const provider = new ethers.providers.JsonRpcProvider('https://finney.uomi.ai');
```

### Best Practices

1. **Load Balancing**
   * Alternate between both endpoints for optimal performance
   * Implement retry logic with endpoint switching
2. **Rate Limiting**
   * Respect rate limits to ensure fair usage
   * Implement appropriate caching strategies
3. **Error Handling**
   * Always implement proper error handling
   * Monitor response times and implement timeouts

### Support

For technical issues or questions:

* Join our Discord community
* Open a GitHub issue
* Contact our developer support team

### Network Parameters

* Chain ID: 4386
* Block Time: 3s

### Monitoring

Both endpoints are continuously monitored for:

* Uptime
* Response time
* Sync status
* Block height consistency


# Build


# Address format

## Address Format

### Understanding UOMI Addresses

UOMI, being built on Substrate and supporting dual Virtual Machine environments, utilizes a unique address system. The blockchain implements the SS58 address format, which is derived from Bitcoin's Base-58-check encoding with specific modifications to support network-specific addressing.

A key feature of the SS58 format is its network identifier prefix, which ensures addresses are uniquely associated with the UOMI network.

### Two Address Types

Due to UOMI's support for both EVM and Wasm smart contracts, the network operates with two distinct types of addresses:

#### 1. Native Address (SS58)

* Uses 256 bits
* Based on Substrate's SS58 encoding
* Used for native blockchain operations and Wasm contracts

#### 2. EVM Address (H160)

* Uses 160 bits
* Begins with "0x" prefix
* Compatible with Ethereum-style operations
* Used for EVM contract interactions

This dual-address system allows UOMI to maintain compatibility with both ecosystems while preserving each environment's unique features and capabilities.


# ink! Environment

### Overview

This guide will help you set up your environment for ink! and Wasm smart contract development in UOMI.

> ℹ️ **Note**\
> Before proceeding, make sure your system meets the requirements for Rust development.

### What is ink!?

ink! is a Rust-based eDSL (embedded Domain Specific Language) developed by Parity Technologies. It's specifically designed for creating smart contracts that work with Substrate's `pallet-contracts`.

Rather than creating a new programming language, ink! adapts Rust's capabilities for smart contract development.

> 💡 **Tip**\
> Want to learn more about why ink! is a great choice for smart contract development? Check out the detailed benefits here.

#### Why WebAssembly?

Curious about the choice of WebAssembly for smart contracts? Find comprehensive [`explanations here.`](https://use.ink/why-rust-for-smart-contracts/)

### Setting Up Your Environment

#### 1. Installing Rust and Cargo

[Rust](https://www.rust-lang.org/) and Cargo are essential prerequisites for Wasm smart contract development.

**Linux and macOS**

```bash
# Download and install
curl https://sh.rustup.rs -sSf | sh

# Configure environment
source ~/.cargo/env
```

**Windows**

Visit the [Rust website](https://www.rust-lang.org/) and follow the Windows installation instructions.

#### 2. Configuring Rust

Set up your Rust environment with these commands:

```bash
rustup default stable
rustup update
rustup update nightly
rustup component add rust-src
rustup component add rust-src --toolchain nightly
rustup target add wasm32-unknown-unknown --toolchain nightly
```

> ⚠️ **Warning**
>
> Due to a bug in `cargo-contract`, building contracts with **rust nightly 1.70.0 or higher will fail**. It is advised to use rustc v1.69.0 or older until the issue is resolved from `cargo-contract` side. For better dev experience it is advised to create a [rust-toolchain file](https://rust-lang.github.io/rustup/overrides.html#the-toolchain-file) in the root of your project directory with following values.
>
> ```
> [toolchain]
> channel = "1.69.0"
> components = [ "rustfmt", "rust-src" ]
> targets = [ "wasm32-unknown-unknown" ]
> profile = "minimal"
> ```
>
> See more [here](https://github.com/paritytech/cargo-contract/issues/1058)

#### 3. Installing ink! CLI

The primary tool you'll need is `cargo-contract`, a CLI tool for managing WebAssembly smart contracts.

**Prerequisites**

First, install binaryen for WebAssembly bytecode optimization:

<details>

<summary>Debian/Ubuntu</summary>

```bash
apt-get update
apt-get -y install binaryen
```

</details>

<details>

<summary>ArchLinux</summary>

```bash
pacman -S binaryen
```

</details>

<details>

<summary>macOS</summary>

```bash
brew install binaryen
```

</details>

<details>

<summary>Windows</summary>

```bash
Find binary releases at https://github.com/WebAssembly/binaryen/releases
```

</details>

**Additional Dependencies**

Install required linking tools:

```bash
cargo install cargo-dylint dylint-link
```

**Installing cargo-contract**

```bash
cargo install cargo-contract --force --locked
```

> 💡 **Tip**\
> Use `--force` to ensure you get the latest version. For a specific version, add `--version X.X.X`

Example for specific version:

```bash
cargo install cargo-contract --force --version 1.5.1
```

Explore available commands with:

```bash
cargo contract --help
```

### Development Container

> 🔧 **Alternative Setup**\
> Skip manual installation by using our pre-configured development container.

Find detailed instructions for using our dev container in the swanky-dev-container Github repository.

### Additional Resources

* [ink! GitHub Repository](https://github.com/use-ink/ink)
* [Official Documentation](https://use.ink/)
* [Dev Container Guide](https://github.com/inkdevhub/swanky-dev-container)


# Wasm Smart Contracts

The **Wasm** section covers the Wasm stack on Astar/Shiden, some more advanced topics, and contains a few tutorials to help you build and deploy Wasm smart contracts.


# Smart Contract Stack

### Runtime Architecture

UOMI's runtime is built on Substrate and incorporates `pallet-contracts`, providing a sandboxed environment for WebAssembly smart contracts. While any language that compiles to Wasm can potentially be used, the code must be compatible with the `pallet-contracts` API.

> 💡 **Tip**\
> For efficient development, it's recommended to use an eDSL (embedded Domain-Specific Language) targeting `pallet-contracts`, such as:
>
> * ink! (Rust-based)
> * ask! (AssemblyScript-based)

### Execution Environment

#### Interpreter

The `pallet-contracts` uses the `wasmi` interpreter to execute Wasm smart contracts.

> ℹ️ **Note**\
> While faster JIT interpreters like `wasmtime` exist, `wasmi` is chosen for its higher degree of interpretation correctness, which is crucial for the untrusted environment of smart contracts.

#### Contract Deployment Process

Contract deployment follows a two-step process:

1. **Code Upload**
   * Upload Wasm contract code to the blockchain
   * Each contract receives a unique `code_hash` identifier
2. **Contract Instantiation**
   * Create contract address and storage
   * Anyone can instantiate a contract using its `code_hash`

**Benefits of Two-Step Deployment**

1. **Storage Efficiency**
   * Multiple instances can share the same code
   * Reduces on-chain storage requirements
   * Particularly efficient for standard tokens (like PSP22 & PSP34)
2. **Flexible Deployment**
   * Create new instances from existing contracts
   * Use `code_hash` for contract instantiation within other contracts
   * Single upload for standard contracts, reducing gas costs
3. **Upgradability**
   * Update contract code while preserving storage and balances
   * Use `set_code_hash` to replace contract code at specific addresses

### Development Tools

#### Client APIs

> 🔧 **Available Tools**
>
> * Polkadot.js API for blockchain interaction via JavaScript
> * contracts-ui web application for contract interaction

### Comparison with Ethereum

| Feature             | Ethereum                    | UOMI                                  |
| ------------------- | --------------------------- | ------------------------------------- |
| Architecture        | Ethereum clients            | Substrate                             |
| Runtime Environment | EVM                         | Wasm pallet-contract + EVM frontier   |
| Gas Model           | Fixed price per instruction | Weight + storage fees + loading fees  |
| Smart Contract DSLs | Solidity and Vyper          | ink! (Rust) and ask! (AssemblyScript) |
| Standards           | EIPs                        | PSPs                                  |

### Additional Resources

* pallet-contracts Rust Documentation
* pallet-contracts GitHub Repository
* Polkadot.js API Documentation

> 📚 **Further Reading**\
> For more detailed information about `pallet-contracts`, visit the Rust docs or GitHub repository.


# Domain-Specific Languages (DSLs)

### Understanding eDSLs

Embedded Domain-Specific Languages (eDSLs) are specialized programming tools that enhance blockchain and smart contract development. These tools operate within existing programming languages, providing developers with a more intuitive and efficient way to write code.

> 💡 **Key Benefit**\
> EDSLs allow developers to write smart contracts at a higher level of abstraction, making code more readable, maintainable, and less prone to errors.

#### Why Use eDSLs?

EDSLs offer several advantages for blockchain development:

* More expressive and intuitive code writing
* Built-in error checking mechanisms
* Enhanced debugging capabilities
* Specialized testing frameworks
* Domain-specific optimizations

For example, rather than using pure Rust for Wasm smart contracts, developers can use specialized Rust eDSLs designed specifically for blockchain development, making the code more natural and easier to maintain.

### Available eDSLs

#### ink!

> ℹ️ **What is ink!?**\
> ink! is a Rust-based eDSL developed by Parity Technologies, specifically designed for Substrate's `pallet-contracts`.

**Key Features**

* Rust procedural macros support
* Comprehensive crate ecosystem
* Reduced boilerplate code
* Direct integration with `pallet-contracts` API

**Resources**

* [Official Documentation](https://ink.substrate.io/why-rust-for-smart-contracts)
* [GitHub Repository](https://github.com/paritytech/ink)
* [API Reference](https://docs.rs/pallet-contracts/latest/pallet_contracts/api_doc/trait.Current.html)

#### ask!

> 🚧 **Development Status**\
> ask! is a Polkadot treasury funded project currently under active development.

**Overview**

* Framework for AssemblyScript developers
* TypeScript-like syntax
* Targets `pallet-contracts` for Wasm smart contracts

**Resources**

* [GitHub Repository](https://github.com/ask-lang/ask)
* [Treasury Proposal](https://polkadot.polkassembly.io/post/949)

### Choosing the Right eDSL

When selecting an eDSL for your project, consider:

1. **Programming Language Familiarity**
   * ink! for Rust developers
   * ask! for TypeScript/AssemblyScript developers
2. **Project Requirements**
   * Smart contract complexity
   * Performance needs
   * Team expertise
3. **Development Status**
   * ink! is production-ready
   * ask! is under development

> 📚 **Learn More**\
> For detailed information about using these eDSLs, refer to their respective documentation and GitHub repositories.


# ink! Development

### Introduction

ink! is a Rust-based eDSL (embedded Domain-Specific Language) developed by Parity Technologies for writing smart contracts on Substrate's `pallet-contracts`.

> 💡 **Why ink!?**\
> ink! is currently the most widely supported eDSL for Substrate-based smart contracts, with strong backing from both Parity and the builder community.

### Key Features

ink! provides developers with powerful tools and features:

#### Core Capabilities

* Write smart contracts using idiomatic Rust code
* Leverage ink! macros and attributes via `#[ink::contract]`
* Utilize trait definitions and implementations
* Create upgradeable contracts through delegate calls
* Interact with Substrate pallets using Chain Extensions
* Perform off-chain testing with `#[ink(test)]`

#### Development Tools

* Procedural macros for simplified development
* Comprehensive crate ecosystem
* Reduced boilerplate code requirements

> ⚙️ **Getting Started**\
> For installation instructions, visit the ink! Environment section.

### Development Resources

#### Official Documentation

* [GitHub Repository](https://github.com/paritytech/ink)
* [Introduction Guide](https://paritytech.github.io/ink/)
* [Official Documentation](https://use.ink/)
* [Rust Documentation](https://docs.rs/ink/4.0.0-rc/ink/index.html)

#### Key Topics

* [Contract Macros & Attributes](https://use.ink/macros-attributes/contract)
* [Trait Support](https://use.ink/3.x/basics/trait-definitions)
* [Upgradeable Contracts](https://use.ink/3.x/basics/upgradeable-contracts)
* [Chain Extensions](https://use.ink/macros-attributes/chain-extension/)


# ask! Development

> ⚠️ **Production Warning**\
> ask! eDSL currently has several limitations and issues being actively addressed. It is not recommended for production environments. Consider using ink! for production contracts.
>
> [View known issues](https://github.com/ask-lang/ask/issues/)

### Introduction

ask! is a framework that enables AssemblyScript developers to write Wasm smart contracts for `pallet-contracts`. With TypeScript-like syntax, it makes smart contract development accessible to JavaScript/TypeScript developers.

> 💡 **Project Status**\
> ask! is a Polkadot treasury funded project currently under active development.

### Prerequisites

* Basic understanding of TypeScript/JavaScript
* Familiarity with package managers (yarn/npm)

### Environment Setup

#### 1. Install Yarn

```bash
npm install --global yarn
```

#### 2. Clone Template Repository

```bash
git clone https://github.com/ask-lang/ask-template.git
cd ask-template
```

#### Project Structure

```
ask-template/
├── asconfig.json        # AssemblyScript config
├── askconfig.json       # ask-lang config
├── build/              
│   └── metadata.json    # Contract metadata
├── flipper.ts          # Contract code
├── index.d.ts          # TypeScript definitions
├── package.json        # Dependencies
└── tsconfig.json       # TypeScript config
```

### Contract Development

#### Basic Contract Structure

```typescript
// Event Definition
@event({ id: 1 })
export class FlipEvent {
    flag: bool;
    constructor(flag: bool) {
        this.flag = flag;
    }
}

// Storage Layout
@spreadLayout
@packedLayout
export class Flipper {
    flag: bool;
    constructor(flag: bool = false) {
        this.flag = flag;
    }
}

// Contract Logic
@contract
export class Contract {
    // Contract implementation
}
```

#### Key Components

**1. Storage**

```typescript
@spreadLayout
@packedLayout
export class Flipper {
    flag: bool;
    constructor(flag: bool = false) {
        this.flag = flag;
    }
}
```

**2. Contract Methods**

```typescript
@contract
export class Contract {
    // Constructor
    @constructor()
    default(flag: bool): void {
        this.data.flag = flag;
    }

    // Mutable Method
    @message({ mutates: true })
    flip(): void {
        this.data.flag = !this.data.flag;
        let event = new FlipEvent(this.data.flag);
        env().emitEvent(event);
    }

    // Read-only Method
    @message()
    get(): bool {
        return this.data.flag;
    }
}
```

**3. Events**

```typescript
@event({ id: 1 })
export class FlipEvent {
    flag: bool;
    constructor(flag: bool) {
        this.flag = flag;
    }
}

// Emitting events
env().emitEvent(new FlipEvent(true));
```

### Building Your Contract

```bash
# Install dependencies and build
yarn && yarn build flipper.ts
```

This generates:

* `flipper.optimized.wasm`: Compiled WebAssembly code
* `metadata.json`: Contract metadata
* `flipper.wat`: WebAssembly text format (human-readable)

### Deployment Process

1. Access [polkadot.js](https://polkadot.js.org/apps/)
2. Select your target network
3. Upload contract files:
   * `metadata.json` for ABI
   * `flipper.optimized.wasm` for contract code
4. Follow the deployment wizard
5. Confirm deployment success

### Additional Resources

#### Documentation

* [Official ask! Documentation](https://github.com/ask-lang/ask)
* [Polkadot Treasury Proposal](https://polkadot.polkassembly.io/post/949)

#### Support

Need help? Join our [Discord Community](https://discord.com/invite/KXh72E2gPe)

#### Development Tips

* Use TypeScript-aware IDEs for better development experience
* Keep track of event IDs to avoid conflicts
* Test thoroughly before deployment
* Monitor gas usage and optimization


# Basic ink! Contract

### Project Structure

Each ink! contract requires its own crate with two essential files:

* `Cargo.toml`: Project configuration and dependencies
* `lib.rs`: Contract implementation

> 💡 **Tip**\
> You can use Swanky Suite to quickly bootstrap a new project. Check out the Swanky CLI guide for details.

### Contract Configuration

#### Cargo.toml Setup

Your `Cargo.toml` should include the following sections:

```toml
[package]
name = "my_contract"
version = "0.1.0"
authors = ["Your Name <name@email.com>"]
edition = "2021"

[dependencies]
ink = { version = "4.3", default-features = false}
ink_metadata = { version = "4.3", features = ["derive"], optional = true }
scale = { package = "parity-scale-codec", version = "3", default-features = false, features = ["derive"] }
scale-info = { version = "2.5", default-features = false, features = ["derive"], optional = true }

[dev-dependencies]
ink_e2e = { version = "4.3" }

[lib]
path = "lib.rs"

[features]
default = ["std"]
std = [
    "ink/std",
    "scale/std",
    "scale-info/std"
]
ink-as-dependency = []
e2e-tests = []
```

### Contract Implementation

#### Minimum Requirements

Every ink! contract must include:

> ⚠️ **Required Elements**
>
> 1. `no_std` attribute for non-standard library compilation
> 2. Contract module marked with `#[ink::contract]`
> 3. Storage struct with `#[ink(storage)]`
> 4. At least one constructor with `#[ink(constructor)]`
> 5. At least one message with `#[ink(message)]`

#### Basic Contract Template

```rust
#![cfg_attr(not(feature = "std"), no_std)]

#[ink::contract]
mod my_contract {
    /// Contract storage
    #[ink(storage)]
    pub struct MyContract {}

    impl MyContract {
        /// Contract constructor
        #[ink(constructor)]
        pub fn new() -> Self {
            Self {}
        }

        /// Contract message
        #[ink(message)]
        pub fn do_something(&self) {
            ()
        }
    }
}
```

### Example Contracts

#### Flipper Contract

The [flipper contract](https://github.com/paritytech/ink-examples/blob/main/flipper/lib.rs) is the simplest example provided by the ink! team, perfect for understanding basic contract structure.

### Best Practices

1. **Project Organization**
   * Keep one contract per crate
   * Use meaningful names for contract modules
   * Organize tests in a separate module
2. **Code Structure**
   * Group related functionality together
   * Document your code with comments
   * Follow Rust naming conventions
3. **Testing**
   * Include unit tests
   * Add integration tests where needed
   * Use ink!'s testing utilities


# EVM Smart Contracts


# Introduction to EVM Smart Contracts

### What are EVM Smart Contracts?

Smart contracts on UOMI are programs that run on the Ethereum Virtual Machine (EVM). These self-executing contracts contain code and data that live at a specific address on the blockchain. Being EVM-compatible, UOMI supports the same smart contract functionality as Ethereum, allowing developers to write and deploy contracts using familiar tools and languages.

### Programming Language

Smart contracts on UOMI are primarily written in Solidity, the most widely used programming language for EVM development. Solidity is:

* Object-oriented and high-level
* Specifically designed for smart contracts
* Similar to JavaScript/C++ in syntax
* Statically typed

> 💡 **Note**\
> While Solidity is the most common choice, you can also use other EVM-compatible languages like Vyper.

### Development Requirements

To start developing smart contracts on UOMI, you'll need:

#### 1. MetaMask Wallet

* Browser extension for interacting with EVM chains
* Manages your accounts and transactions
* Connects dApps to the blockchain

#### 2. UOMI Network Configuration

```
Network Name: UOMI Finney Testnet
RPC URL: https://finney.uomi.ai
Chain ID: 4386
Currency Symbol: UOMI
```

#### 3. Development Tools

* **Solidity Compiler**: Converts Solidity code to EVM bytecode
* **Development Framework**: Hardhat, Truffle, or Foundry
* **Code Editor**: VS Code with Solidity extensions recommended

### Smart Contract Basics

#### Contract Structure

```solidity
// SPDX-License-Identifier: MIT
pragma solidity ^0.8.19;

contract MyContract {
    // State variables
    uint256 public value;

    // Events
    event ValueChanged(uint256 newValue);

    // Constructor
    constructor() {
        value = 0;
    }

    // Functions
    function setValue(uint256 newValue) public {
        value = newValue;
        emit ValueChanged(newValue);
    }
}
```

#### Key Concepts

1. **State Variables**
   * Permanently stored in contract storage
   * Represent the contract's state
2. **Functions**
   * Execute contract logic
   * Can be public, private, internal, or external
   * Can modify state or be view/pure
3. **Events**
   * Log important changes
   * Can be monitored by applications

### Interacting with Smart Contracts

You can interact with smart contracts through:

1. **MetaMask**
   * Send transactions
   * Manage accounts
   * Connect to dApps
2. **Web3 Libraries**
   * ethers.js
   * web3.js
3. **Block Explorers**
   * View transactions
   * Verify contracts
   * Monitor events

### Getting Started

1. **Set Up MetaMask**
   * Install the extension
   * Create or import an account
   * Add UOMI network
2. **Get Test Tokens**
   * Use the [testnet faucet](https://app.uomi.ai/faucet)
   * Required for deployment and testing
3. **Choose Development Tools**
   * Install development framework
   * Set up your IDE
   * Configure network settings

### Next Steps

Ready to start developing? Check out:

* [Your First Smart Contract](/build/evm-smart-contracts/your-first-evm-smart-contract)
* [HardHat](/build/evm-smart-contracts/hardhat)


# HardHat

### Hardhat Setup

> 💡 **New to Hardhat?**\
> Check out the [Hardhat Quick Start Guide](https://hardhat.org/getting-started/#quick-start#overview) for basics.

#### Project Setup

**1. Configure Your Account**

To deploy contracts to UOMI networks, you'll need to export your private key from MetaMask:

1. Open MetaMask
2. Select your account
3. Click the three dots menu
4. Go to "Account Details"
5. Select "Export Private Key"
6. Enter your password to confirm

You'll get a 64-character hex string like:

```
60ed0dd24087f00faea4e2b556c74ebfa2f0e705f8169733b01530ce4c619883
```

**2. Store Your Private Key**

Create `private.json` in your project root:

```json
{
  "privateKey": "YOUR_PRIVATE_KEY_HERE"
}
```

> ⚠️ **Security Warning**\
> Never commit your private key to version control. Add `private.json` to your `.gitignore` file.

**3. Configure Networks**

Modify your `hardhat.config.js`:

```javascript
const { privateKey } = require("./private.json");

module.exports = {
  networks: {
    // Finney Testnet
    finney: {
      url: "https://finney.uomi.ai",
      chainId: XXX,
      accounts: [privateKey],
    },
  }
};
```

**4. Deploy Your Contract**

```bash
npx hardhat run --network finney scripts/deploy.js
```

### Truffle Setup

#### Prerequisites

Install the HD Wallet Provider:

```bash
npm install @truffle/hdwallet-provider
```

#### Configuration

Modify your `truffle-config.js`:

```javascript
const HDWalletProvider = require('@truffle/hdwallet-provider');
const { privateKey } = require('./private.json');

module.exports = {
  networks: {
    // Finney Testnet
    finney: {
      provider: () => new HDWalletProvider(
        privateKey,
        'https://finney.uomi.ai'
      ),
      network_id: XXX,
    },
  }
};
```

#### Deployment

Deploy to your chosen network:

```bash
truffle migrate --network finney
```

> 💡 **Note**\
> If no network is specified, Truffle will use the default development network.


# Your first EVM Smart Contract

## Your First Smart Contract

### Overview

In this guide, we'll create, deploy, and interact with a simple smart contract on UOMI's EVM network using Hardhat. We'll build a basic "Counter" contract that can increment and retrieve a number.

### Prerequisites

Before starting, ensure you have:

* Node.js installed
* A code editor (VS Code recommended)
* A MetaMask wallet with some test tokens
* Basic knowledge of Solidity

### Project Setup

1. Create a new directory and initialize the project:

```bash
mkdir counter-contract
cd counter-contract
npm init -y
```

2. Install required dependencies:

```bash
npm install --save-dev hardhat @nomicfoundation/hardhat-toolbox
```

3. Create a Hardhat project:

```bash
npx hardhat init
```

Select "Create a JavaScript project" when prompted.

### Writing the Contract

Create a new file `contracts/Counter.sol`:

```solidity
// SPDX-License-Identifier: MIT
pragma solidity ^0.8.19;

contract Counter {
    uint256 private count;
    
    // Event to emit when the counter changes
    event CountUpdated(uint256 newCount);
    
    constructor() {
        count = 0;
    }
    
    function increment() public {
        count += 1;
        emit CountUpdated(count);
    }
    
    function getCount() public view returns (uint256) {
        return count;
    }
}
```

### Deployment Script

Create/modify `scripts/deploy.js`:

```javascript
async function main() {
  const Counter = await ethers.getContractFactory("Counter");
  const counter = await Counter.deploy();
  await counter.waitForDeployment();

  console.log("Counter deployed to:", await counter.getAddress());
}

main()
  .then(() => process.exit(0))
  .catch((error) => {
    console.error(error);
    process.exit(1);
  });
```

### Test the Contract

Create `test/Counter.js`:

```javascript
const { expect } = require("chai");

describe("Counter", function () {
  let counter;

  beforeEach(async function () {
    const Counter = await ethers.getContractFactory("Counter");
    counter = await Counter.deploy();
  });

  it("Should start with count of 0", async function () {
    expect(await counter.getCount()).to.equal(0);
  });

  it("Should increment count", async function () {
    await counter.increment();
    expect(await counter.getCount()).to.equal(1);
  });
});
```

Run the tests:

```bash
npx hardhat test
```

### Deploy to Testnet

1. Configure your network in `hardhat.config.js`:

```javascript
require("@nomicfoundation/hardhat-toolbox");

// Go to https://finney.uomi.ai and replace this with your own RPC URL
const FINNEY_RPC_URL = "https://finney.uomi.ai";

// Replace this private key with your own
// To export your private key from Metamask, go to Account Details > Export Private Key
const PRIVATE_KEY = "YOUR-METAMASK-PRIVATE-KEY";

module.exports = {
  solidity: "0.8.19",
  networks: {
    finney: {
      url: FINNEY_RPC_URL,
      accounts: [PRIVATE_KEY],
    },
  },
};
```

2. Deploy to Finney testnet:

```bash
npx hardhat run scripts/deploy.js --network finney
```

### Interact with Your Contract

After deployment, you can interact with your contract using:

1. The Hardhat console:

```bash
npx hardhat console --network finney
```

2. Example interactions:

```javascript
// Get the contract
const Counter = await ethers.getContractFactory("Counter");
const counter = await Counter.attach("YOUR-DEPLOYED-CONTRACT-ADDRESS");

// Get the current count
const count = await counter.getCount();
console.log("Current count:", count);

// Increment the counter
await counter.increment();
```

### Next Steps

Now that you've deployed your first contract, you can:

1. Add more functionality to your contract
2. Create a frontend to interact with it
3. Learn about contract security and best practices
4. Explore more complex smart contract patterns

### Common Issues and Solutions

> ⚠️ **Common Problems**
>
> * **Transaction Failed**: Make sure you have enough tokens for gas
> * **Contract Not Found**: Verify the contract address is correct
> * **Network Issues**: Ensure you're connected to the correct network

### Resources

* [Solidity Documentation](https://docs.soliditylang.org/)
* [Hardhat Documentation](https://hardhat.org/getting-started/)
* [OpenZeppelin Contracts](https://docs.openzeppelin.com/contracts/)


# Debug EVM Transactions

### Overview

UOMI provides advanced transaction tracing capabilities through Geth's debug APIs and OpenEthereum's trace module. These non-standard RPC methods offer deep insights into transaction processing and execution.

### Available Debug Methods

#### debug\_traceTransaction

Replays a transaction in the exact manner it was executed on the network.

```bash
curl http://127.0.0.1:9944 -H "Content-Type:application/json;charset=utf-8" -d \
  '{
    "jsonrpc":"2.0",
    "id":1,
    "method":"debug_traceTransaction",
    "params": ["YOUR-TRANSACTION-HASH"]
  }'
```

Optional parameters:

* `disableStorage`: (default: false) Disables storage capture
* `disableMemory`: (default: false) Disables memory capture
* `disableStack`: (default: false) Disables stack capture

#### debug\_traceBlock

Returns a full stack trace of all invoked opcodes for all transactions in a block.

Variants:

* `debug_traceBlockByHash`
* `debug_traceBlockByNumber`

#### debug\_traceCall

Executes an eth-call-like operation within the context of a given block.

#### trace\_filter

Filters and retrieves trace data based on specific criteria.

```bash
curl http://127.0.0.1:9944 -H "Content-Type:application/json;charset=utf-8" -d \
  '{
    "jsonrpc":"2.0",
    "id":1,
    "method":"trace_filter",
    "params":[{
      "fromBlock":"4142700",
      "toBlock":"4142800",
      "toAddress":["0xYOUR-ADDRESS"],
      "after":0,
      "count":20
    }]
  }'
```

Parameters:

* `fromBlock`: Starting block number
* `toBlock`: Ending block number
* `fromAddress`: Filter transactions from these addresses
* `toAddress`: Filter transactions to these addresses
* `after`: Trace offset (default: 0)
* `count`: Number of traces to return

> ⚠️ **Important Limits**
>
> * Maximum 500 trace entries per request
> * Trace cache duration: 300 seconds

### Running a Debug Node

To access these debugging features, you need to run a node with specific debug flags enabled.

#### Required Flags

```bash
--ethapi=debug     # Enables debug_traceTransaction
--ethapi=trace     # Enables trace_filter
--ethapi=txpool    # Enables transaction pool APIs
--runtime-cache-size 64
```

#### Optional Configurations

```bash
--ethapi-trace-max-count <number>    # Maximum trace entries
--ethapi-trace-cache-duration <seconds>    # Cache duration
```

### Transaction Pool API

Check the transaction pool status:

```bash
curl http://127.0.0.1:9944 -H "Content-Type:application/json;charset=utf-8" -d \
  '{
    "jsonrpc":"2.0",
    "id":1,
    "method":"txpool_status",
    "params":[]
  }'
```

> 💡 **Note**\
> The `txpool` API requires the `--ethapi=txpool` flag when starting the node.

### Best Practices

1. **Node Configuration**
   * Enable only the debug features you need
   * Consider memory usage when setting cache sizes
   * Monitor node performance with tracing enabled
2. **API Usage**
   * Use specific filters to limit data returned
   * Consider pagination for large trace requests
   * Cache commonly requested trace data

### Common Issues

* **Request Timeout**: Reduce the trace range or add more filters
* **Memory Issues**: Adjust cache size and duration
* **Missing Data**: Verify node sync status and cache duration


# Precompiles

A precompile is a common functionality used in smart contracts that has been compiled in advance, so Ethereum nodes can run it more efficiently. From a contract's perspective, this is a single command like an opcode. The Frontier EVM used on Uomi network provides several useful precompiled contracts. These contracts are implemented in our ecosystem as a native implementation. The precompiled contracts `0x01` through `0x08` are the same as those in Ethereum (see list below). Additionally, Uomi implements precompiled contracts that support new Uomi features.

### Ethereum Native Precompiles <a href="#ethereum-native-precompiles" id="ethereum-native-precompiles"></a>

<table><thead><tr><th width="150">Precompile</th><th>Address</th></tr></thead><tbody><tr><td>ECRecover</td><td>0x0000000000000000000000000000000000000001</td></tr><tr><td>Sha256</td><td>0x0000000000000000000000000000000000000002</td></tr><tr><td>Ripemd160</td><td>0x0000000000000000000000000000000000000003</td></tr><tr><td>Identity</td><td>0x0000000000000000000000000000000000000004</td></tr><tr><td>Modexp</td><td>0x0000000000000000000000000000000000000005</td></tr><tr><td>Bn128Add</td><td>0x0000000000000000000000000000000000000006</td></tr><tr><td>Bn128Mul</td><td>0x0000000000000000000000000000000000000007</td></tr><tr><td>Bn128Pairing</td><td>0x0000000000000000000000000000000000000008</td></tr></tbody></table>

### Uomi Specific Precompiles <a href="#astar-specific-precompiles" id="astar-specific-precompiles"></a>

<table><thead><tr><th width="177">Precompile</th><th>Address</th></tr></thead><tbody><tr><td>Sr25519</td><td>0x0000000000000000000000000000000000005002</td></tr><tr><td>SubstrateECDSA</td><td>0x0000000000000000000000000000000000005003</td></tr><tr><td>Assets-erc20</td><td>ASSET_PRECOMPILE_ADDRESS_PREFIX</td></tr><tr><td>UomiEngine</td><td>0x00000000000000000000000000000000756f6D69</td></tr></tbody></table>

The interface descriptions for these precompiles can be found in the `precompiles` folder:  [Uomi repo](https://github.com/Uomi-network/uomi-node). The Addresses can be checked in the [Uomi repo](https://github.com/Uomi-network/uomi-node) for each runtime in `precompile.rs` files.

***

## Usage example

Here we'll demonstrate a simple smart contract that can interact with Sr25519 precompile

```solidity
// SPDX-License-Identifier: GPL-3.0-or-later
pragma solidity ^0.8.0;

contract Sr25519Caller {
    address constant precompileAddress = 0x0000000000000000000000000000000000005002;

    function verify(bytes32 publicKey, bytes memory signature, bytes memory message) public view returns (bool) {
        (bool success, bytes memory result) = precompileAddress.staticcall(
            abi.encodeWithSignature("verify(bytes32,bytes,bytes)", publicKey, signature, message)
        );
        require(success, "Failed to call precompile");
        return abi.decode(result, (bool));
    }
}
```


# SR25519

The SR25519 precompile provides an interface to verify a message signed with Schnorr sr25519 algorithm.

> Web3 Foundation has implemented a Schnorr signature library using the more secure Ristretto compression over the Curve25519 in the Schnorrkel repository. Schnorrkel implements related protocols on top of this curve compression such as HDKD, MuSig, and a verifiable random function (VRF). It also includes various minor improvements such as the hashing scheme STROBE that can theoretically process huge amounts of data with only one call across the Wasm boundary.

> The implementation of Schnorr signatures used in Polkadot that uses Schnorrkel protocols over a Ristretto compression of Curve25519, is known as sr25519.

For [more context](https://wiki.polkadot.network/docs/learn-keys#what-is-sr25519-and-where-did-it-come-from) see the Polkadot Wiki.

```solidity
    function verify(
        bytes32 public_key,
        bytes calldata signature,
        bytes calldata message
    ) external view returns (bool);
```

The `verify` function can be used to check that `public_key` was used to generate `signature` for `message`.


# Substrate ECDSA

## Substrate ECDSA

The Substrate ECDSA precompile provides an interface to verify a message signed with ECDSA algorithm.

> Most cryptocurrencies, including Bitcoin and Ethereum, currently use ECDSA signatures on the secp256k1 curve. This curve is considered much more secure than NIST curves, which have possible backdoors from the NSA. The Curve25519 is considered possibly even more secure than this one and allows for easier implementation of Schnorr signatures. A recent patent expiration on it has made it the preferred choice for use in Polkadot.

For [more context](https://wiki.polkadot.network/docs/learn-keys#why-was-ed25519-selected-over-secp256k1) see the Polkadot Wiki.

```solidity
    function verify(
        bytes32 public_key,
        bytes calldata signature,
        bytes calldata message
    ) external view returns (bool);
```

The `verify` function can be used to check that `public_key` was used to generate `signature` for `message`.


# XC20

### Overview[​](https://docs.astar.network/docs/learn/interoperability/xcm/building-with-xcm/create-xc20-assets#overview) <a href="#overview" id="overview"></a>

XC20 assets, created by the [Moonbeam](https://moonbeam.network/blog/introducing-xc-20s-the-new-standard-for-cross-chain-tokens-on-dotsama/) team, maintains compatibility between the EVM and Substrate framework that powers Polkadot, via precompiles — a set of built-in smart contracts made to look like ERC20s. Calling functions on an XC20 will invoke underlying Substrate functionality, which may be instructions for transferring tokens to another chain, or to send them to another local address. This compatibility layer connects the world of EVM and smart contracts to advanced Substrate-based interoperability scenarios.

### Create an XC20 Asset[​](https://docs.astar.network/docs/learn/interoperability/xcm/building-with-xcm/create-xc20-assets#create-an-xc20-asset) <a href="#create-an-xc20-asset" id="create-an-xc20-asset"></a>

XC20 asset refers to interface it uses to wrap around an asset in `assets-pallets`. So first we will need to create, mint and set metadata for an asset in `assets-pallets` and then access it from smart-contract using XC20 precompile interface.

This section of the guide will demonstrate how to register an asset using [Polkadot.js Apps](https://polkadot.js.org/apps).

### Create the Asset[​](https://docs.astar.network/docs/learn/interoperability/xcm/building-with-xcm/create-xc20-assets#create-the-asset) <a href="#create-the-asset" id="create-the-asset"></a>

Before the asset's Metadata can be set, we will need to create an asset on the network using the following steps:

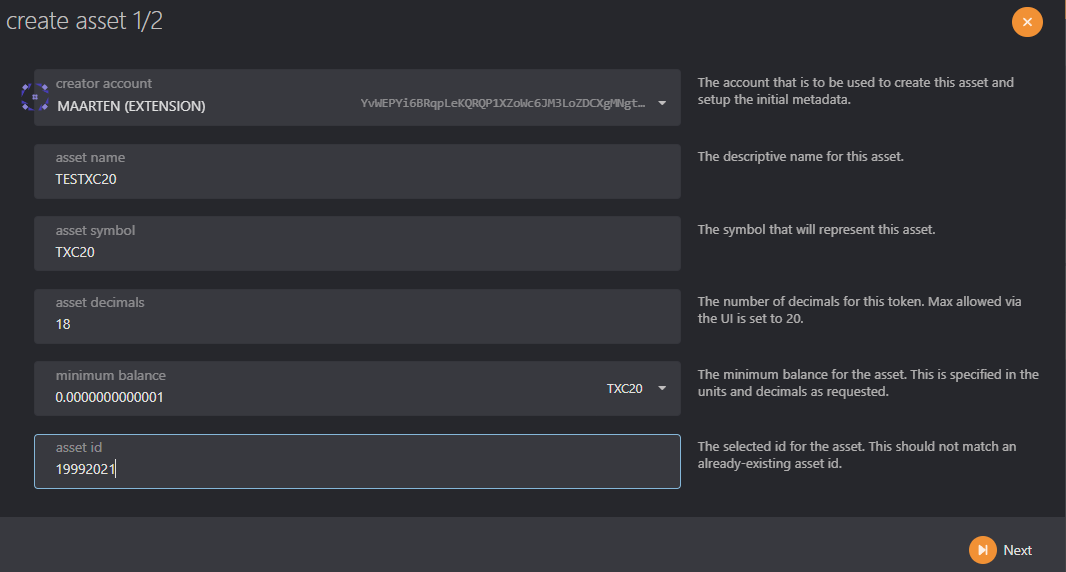
1. Navigate within [Polkadot.js Apps](https://polkadot.js.org/apps) to Network and click on **Assets**.
2. Click on **+ Create** on the right to open the create asset pop-up.
3. Enter the **asset name, asset symbol**, and set the number of **decimals** for the asset. This doesn't have to be 18 decimals like the network native assets, it's completely configurable.
4. The **minimum balance** is the Existential Deposit (ED) of your asset. The ED exists so that accounts with very small balances, or that are empty, do not "bloat" the state of the blockchain and diminish its performance. **NOTE**: setting this value to pico units and minimum balance to 1, will only require 0.000000000001 units. We suggest having a minimum balance of **1**.
5. The asset id will be automatically generated for you. The valid range for permissionless creation is up to `2^32 - 1`.
6. When everything is filled in, click **Next** on the next screen.
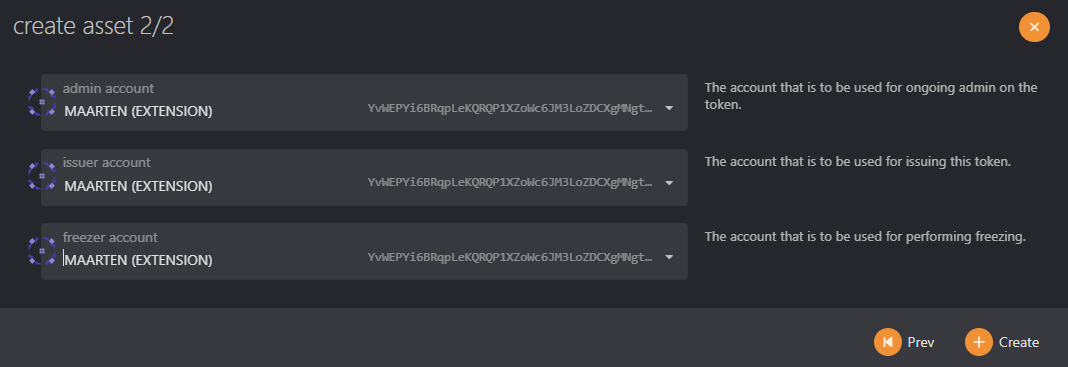
7. Set your **roles** and create the asset by signing with the creator account.

{% hint style="info" %}
**NOTE**

Please make sure the account creating the asset has sufficient balance to pay the fees.
{% endhint %}

<figure><img src="https://docs.astar.network/assets/images/5-b0cfbcdfde9a0bdd971cba2830bdb215.png" alt=""><figcaption></figcaption></figure>

<figure><img src="https://docs.astar.network/assets/images/6-0907b1efe54abbc46201286e9045c822.png" alt=""><figcaption></figcaption></figure>

There are a few roles that are important to take note of when registering and managing assets. These roles, with the exception of the creator, can all be designated to other accounts by the owner via the assets -> setTeam extrinsic. The roles are as follows:

* **Creator** - the account responsible for creating the asset.
* **Issuer** - the designated account capable of issuing or minting tokens. Defaults to the owner.
* **Admin** - the designated account capable of burning tokens and unfreezing accounts and assets. Defaults to the owner.
* **Freezer** - the designated account capable of freezing accounts and assets. Defaults to the owner.

### Mint Asset[​](https://docs.astar.network/docs/learn/interoperability/xcm/building-with-xcm/create-xc20-assets#mint-asset) <a href="#mint-asset" id="mint-asset"></a>

The asset is now created on our network, but has no supply. To mint the tokens, click on the +Mint button next to the asset to open the mint pop-up.

![Mint your assets](https://docs.astar.network/assets/images/7-5783c13d065720c7882a981d33f71ca1.png)

1. Only the **issuer account** has permission to mint the token.
2. Enter the address that will receive the minted tokens. We recommend using a [multisig](https://docs.astar.network/docs/use/manage-wallets/create-multisig/).

### Set Asset Metadata[​](https://docs.astar.network/docs/learn/interoperability/xcm/building-with-xcm/create-xc20-assets#set-asset-metadata) <a href="#set-asset-metadata" id="set-asset-metadata"></a>

The metadata includes the asset name, symbol, and decimals.

To set the asset metadata, click on **Developer** at the top of the page and then select **Extrinsics** from the dropdown. From there, take the following steps:

1. Select the owner's account
2. From the **submit the following extrinsic** dropdown, choose **assets**
3. Then select the `setMetadata` extrinsic
4. Enter the asset id from the asset you created before
5. Enter the name of the asset
6. Set the symbol for the asset
7. Set the decimals for the asset
8. Click on **Submit Transaction**

![Set Token Metadata](https://docs.astar.network/assets/images/8-d7ca273722e11fb849645db9e60c4253.png)

You can use the **Extrinsics** page to perform other functions such as minting tokens, delegating a team, freeze and thaw assets or accounts, and more.

### Calculate XC20 Precompile Address[​](https://docs.astar.network/docs/learn/interoperability/xcm/building-with-xcm/create-xc20-assets#calculate-xc20-precompile-address) <a href="#calculate-xc20-precompile-address" id="calculate-xc20-precompile-address"></a>

To access our asset as XC20 in MetaMask or another EVM wallet, we will need to use its precompile address. The XC20 precompile address is using the following rule:

`address = "0xFFFFFFFF" + DecimalToHexWith32Digits(AssetId)`

The first step is to take the asset Id and convert it to a hex value. You can use the search engine of your choice to look up a simple tool for converting decimals to hex values. In this tutorial, we will use this [decimal to hexadecimal converter](https://www.rapidtables.com/convert/number/decimal-to-hex.html).

For asset ID `19992021`, the hex value is `1310DD5`.

XC20 precompiles can only fall between `0xFFFFFFFF00000000000000000000000000000000` and `0xFFFFFFFFFFFFFFFFFFFFFFFFFFFFFFFFFFFFFFFF`. As such, the first 8 characters of the address will always be `FFFFFFFF`. Since Ethereum addresses are 40 characters long, you will need to prepend 0s to the hex value until the address has 40 characters.

The hex value that was already generated in the example is 7 characters long, so prepending the first 8 characters, `FFFFFFFF`, to the hex value will give you the part of the 40-character address you need to interact with the XC20 precompile. Note that you still need to add zeros to get the 40-character address. You add the zeros between `FFFFFFFF` and generated hex.

For this example, the full address is `0xFFFFFFFF00000000000000000000000001310dD5`.

{% hint style="info" %}
**NOTE**\
To use this address inside a solidity smart-contract, checksum of the address should be respected. Please use [toChecksumAddress](https://web3-tools.netlify.app/) converter that will convert your address.\
for example `0xFFFFFFFF00000000000000000000000001310dD5` will be converted to `0xfFFfffFF00000000000000000000000001310dD5`
{% endhint %}

Now that you've generated the XC20 precompile address, you can use the address to interact with the XC20 as you would with any other ERC20 in Remix.


# Run a node

{% content-ref url="/pages/uxOK0QAXHsa51bxDloB4" %}
[Run an archive node](/build/run-a-node/run-an-archive-node)
{% endcontent-ref %}

{% content-ref url="/pages/f887j4BjhByXUxDXr8ay" %}
[Run a full node](/build/run-a-node/run-a-full-node)
{% endcontent-ref %}


# Run an archive node

### Overview[​](https://docs.astar.network/docs/build/nodes/archive-node/#overview) <a href="#overview" id="overview"></a>

An **archive node** stores the history of past blocks. Most of times, an archive node is used as **RPC endpoint**. RPC plays a vital role on our network: it connects users and dApps to the blockchain through WebSocket and HTTP endpoints.&#x20;

**DApp projects** need to run their own RPC node as archive to the retrieve necessary blockchain data and not to rely on public infrastructure. Public endpoints respond slower because of the large amount of users connected and are rate limited.

{% hint style="warning" %}
**CAUTION**\
Be careful not to confuse with a **full node** that has a pruned database: a full node only stores the current state and most recent blocks (256 blocks by default) and uses much less storage space.
{% endhint %}

We maintain 2 different networks: the testnet Uomi Finney and the mainnet Uomi

| Type    | Name   | Token |
| ------- | ------ | ----- |
| Testnet | Finney | $UOMI |
| Mainnet | Uomi   | $UOMI |

### Requirements[​](https://docs.astar.network/docs/build/nodes/archive-node/#requirements) <a href="#requirements" id="requirements"></a>

#### Machine[​](https://docs.astar.network/docs/build/nodes/archive-node/#machine) <a href="#machine" id="machine"></a>

{% hint style="info" %}
**NOTE**

* Storage space will increase as the network grows.
* Archive nodes may require a larger server, depending on the amount and frequency of data requested by a dApp.
  {% endhint %}

| Component | Min. requirement             |
| --------- | ---------------------------- |
| System    | Ubuntu 22.04                 |
| CPU       | 8 cores                      |
| Memory    | 16 GB                        |
| Hard Disk | 500 GB SSD (NVMe preferable) |

#### Ports[​](https://docs.astar.network/docs/build/nodes/archive-node/#ports) <a href="#ports" id="ports"></a>

The Uomi node needs different ports to run:

| Description | Port  | Custom Port Flag    |
| ----------- | ----- | ------------------- |
| P2P         | 30333 | `--port`            |
| RPC         | 9944  | `--rpc-port`        |
| Prometheus  | 9615  | `--prometheus-port` |

For all types of nodes, ports `30333` need to be opened for incoming traffic at the Firewall. **Validator nodes should not expose WS and RPC ports to the public.**

***

### Installation[​](https://docs.astar.network/docs/build/nodes/archive-node/#installation) <a href="#installation" id="installation"></a>

Using [Binary](/build/run-a-node/run-an-archive-node/binary) - run the node from binary file and set it up as systemd service

<br>


# Binary

In this guide, we will use the binary provided in Uomi release.

If you have experience with Rust compilation, you can also build the binary from the repo.

## Installing an Archive Node

### System Requirements

> ⚠️ **Minimum Hardware Requirements**
>
> * RAM: 16GB&#x20;
> * Storage: 500GB
> * CPU: 8 cores
> * Good network connectivity

### Prerequisites

Before starting the installation, ensure you have:

* Ubuntu 20.04 LTS or higher
* Downloaded the uomi bin and genesis file from: <https://github.com/Uomi-network/uomi-node/releases/latest>
* Get available peers at <https://app.uomi.ai/peers>
* Root or sudo privileges
* The following packages installed:

  ```bash
  sudo apt-get update
  sudo apt-get install -y \
      curl \
      jq \
      build-essential \
      libssl-dev \
      pkg-config \
      cmake \
      git \
      libclang-dev
  ```

### Installation Steps

#### 1. Prepare the Environment

Create necessary directories and user:

```bash
# Create service user
sudo useradd --no-create-home --shell /usr/sbin/nologin uomi

# Create node directory
sudo mkdir -p /var/lib/uomi
sudo chown -R uomi:uomi /var/lib/uomi
```

#### 2. Install Binary Files

Add copied peers inside the genesis.json file:

```json
{
  "name": "Uomi",
  "id": "uomi",
  "chainType": "Live",
  "bootNodes": [PASTE_PEERS_ARRAY_HERE],
 "telemetryEndpoints": null,
  "protocolId": null,
  "properties": {
    "tokenDecimals": 18,
    "tokenSymbol": "UOMI"
  },
...
```

Then install binary and genesis files:

```bash
# Copy binary to system path
sudo cp ./uomi /usr/local/bin/
sudo chmod +x /usr/local/bin/uomi

# Copy genesis file
sudo cp ./genesis.json /usr/local/bin/
```

#### 3. Create Service File

Create a systemd service file at `/etc/systemd/system/uomi.service`:

```ini
[Unit]
Description=Uomi Node
After=network.target
StartLimitIntervalSec=0

[Service]
Type=simple
User=uomi
Group=uomi
Restart=always
RestartSec=10
LimitNOFILE=65535
ExecStart=/usr/local/bin/uomi \
    --name "your-archive-node-name" \
    --chain "/usr/local/bin/genesis.json" \
    --base-path "/var/lib/uomi" \
    --pruning archive \
    --rpc-cors all \
    --rpc-external \
    --rpc-methods Safe \
    --enable-evm-rpc \
    --prometheus-external \
    --telemetry-url "wss://telemetry.polkadot.io/submit/ 0"

# Hardening
ProtectSystem=strict
PrivateTmp=true
PrivateDevices=true
NoNewPrivileges=true
ReadWritePaths=/var/lib/uomi

[Install]
WantedBy=multi-user.target
```

#### 4. Start the Node

```bash
# Reload systemd
sudo systemctl daemon-reload

# Enable service
sudo systemctl enable uomi.service

# Start service
sudo systemctl start uomi.service
```

#### 5. Monitor the Node

Check node status:

```bash
sudo systemctl status uomi.service
```

View logs:

```bash
tail -f /var/log/uomi.log
```

### Verifying Installation

You can verify your node is running correctly by:

1. Checking the service status:

```bash
sudo systemctl status uomi.service
```

2. Verifying RPC endpoint:

```bash
curl -H "Content-Type: application/json" \
    -d '{"id":1, "jsonrpc":"2.0", "method": "system_health", "params":[]}' \
    http://localhost:9944
```

### Common Issues

> 🔧 **Troubleshooting**
>
> 1. **Service Won't Start**
>    * Check logs: `journalctl -u uomi.service -f`
>    * Verify file permissions
>    * Ensure ports are not in use
> 2. **Sync Issues**
>    * Verify network connectivity
>    * Check disk space
>    * Ensure sufficient RAM

### Maintenance

#### Updating the Node

1. Stop the service:

```bash
sudo systemctl stop uomi.service
```

2. Replace the binary:

```bash
sudo cp ./new-uomi /usr/local/bin/uomi
sudo chmod +x /usr/local/bin/uomi
```

3. Restart the service:

```bash
sudo systemctl start uomi.service
```

#### Backup

Regularly backup your node data:

```bash
sudo tar -czf uomi-backup-$(date +%Y%m%d).tar.gz /var/lib/uomi
```

### Security Recommendations

1. **Firewall Configuration**

```bash
sudo ufw allow 9944/tcp  # RPC
sudo ufw allow 30333/tcp # P2P
```

2. **Regular Updates**

* Keep the system updated
* Monitor security announcements
* Update the node software when new versions are released

### Stay Connected

Join our Discord community to:

* Get the latest updates about node operations
* Connect with other node operators
* Receive technical support
* Participate in community discussions

> 💬 **Join Our Community**\
> Join the [UOMI Discord server](https://discord.com/invite/KXh72E2gPe)


# Run a full node

### Overview[​](https://docs.astar.network/docs/build/nodes/full-node#overview) <a href="#overview" id="overview"></a>

Running a full node on Uomi allows you to connect to the network, sync with a bootnode, obtain local access to RPC endpoints, author blocks, and more.

Different from archive node, a full node discards all finalized blocks older than configured number of blocks (256 blocks by default). A full node occupies less storage space than an archive node because of pruning.

A full node may eventually be able to rebuild the entire chain with no additional information, and become an archive node, but at the time of writing, this is not implemented. If you need to query historical blocks past what you pruned, you need to purge your database and resync your node starting in archive mode. Alternatively you can use a backup or snapshot of a trusted source to avoid needing to sync from genesis with the network, and only need the blocks past that snapshot. (reference: <https://wiki.polkadot.network/docs/maintain-sync#types-of-nodes>)

If your node need to provide old historical blocks' data, please consider to use Archive node instead.

### Requirements[​](https://docs.astar.network/docs/build/nodes/full-node#requirements) <a href="#requirements" id="requirements"></a>

Requirements for running any node are similar to what we recommend for archive node. Read more about this [here](/build/run-a-node/run-an-archive-node). Note that Full node requires less disk space. Hard Disk requirement for Archive node is not applied to Full nodes.

To set a full node, you need to specify the number of blocks to be pruned:

```
--pruning 1000 \
```

{% hint style="info" %}
INFO

Running a node for our testnet 'Finney' requires less resources. It's a perfect place to test your node infrastructure and costs.
{% endhint %}


# Become a validator


# Learn about Validators

### Introduction[​](https://docs.astar.network/docs/build/nodes/collator/learn#introduction) <a href="#introduction" id="introduction"></a>

A validator plays an essential role in our network and is responsible for crucial tasks, including block production and transaction confirmation. A validator needs to maintain a high communication response capability to ensure the seamless operation of the Uomi ecosystem.

### Role of validators in the Uomi ecosystem[​](https://docs.astar.network/docs/build/nodes/collator/learn#role-of-collators-in-the-astar-ecosystem) <a href="#role-of-collators-in-the-astar-ecosystem" id="role-of-collators-in-the-astar-ecosystem"></a>

Validators maintain our ecosystem by collecting transactions from users and validating blocks securing the network.

Performance of the network depends directly on validators. To ensure optimal performance of the network, a slashing mechanism is implemented.

#### UOMI-ENGINE[​](https://docs.astar.network/docs/build/nodes/collator/learn#xcmp) <a href="#xcmp" id="xcmp"></a>

Validators are a key element of UOMI-ENGINE, they executes Agents when a request is made by an user, and save the output for the OPoC

***

### Validator election mechanism[​](https://docs.astar.network/docs/build/nodes/collator/learn#collator-election-mechanism) <a href="#collator-election-mechanism" id="collator-election-mechanism"></a>

#### Election process[​](https://docs.astar.network/docs/build/nodes/collator/learn#election-process) <a href="#election-process" id="election-process"></a>

To join the election process you must register for a validator and bond tokens, see Validator Requirements for details. When your node fits the parameters and checks all the boxes to become a validator, it will be added to the chain. **Note: if your validator doesn’t produce blocks during two sessions (2h) it will be kicked out.**

***

### Validator reward distribution mechanism[​](https://docs.astar.network/docs/build/nodes/collator/learn#collator-reward-distribution-mechanism) <a href="#collator-reward-distribution-mechanism" id="collator-reward-distribution-mechanism"></a>

At every block you produced as a validator, rewards will automatically be transferred to your account. The reward includes block reward + fees + Agents fees.

***

### Slash mechanism[​](https://docs.astar.network/docs/build/nodes/collator/learn#slash-mechanism) <a href="#slash-mechanism" id="slash-mechanism"></a>

A slashing mechanism is implemented on Uomi and Finney networks - a validator that doesn't produce blocks during two sessions (2 hours) will be slashed 1% of its total stake and kicked out of the active validator set. This slashing ensures the best block rate and prevents malicious actors from harming the network without financial consequences.


# Validator requirements

**Validator staking requirements**

* Bond: some UOMI tokens (not already defined)
* Meet hardware requirements

If your node stops producing blocks for 1 session, your node will be kicked out of the active set and 1% of the bonded funds will be slashed. Running a node with low performance can lead to skipping blocks which may result in being kicked out of the active set.

***

#### System requirements[​](https://docs.astar.network/docs/build/nodes/collator/requirements#system-requirements) <a href="#system-requirements" id="system-requirements"></a>

A validator can deploy its node on a local or remote server. You can choose your preferred provider for dedicated servers and operating system. Generally speaking, we recommand you to select a provider/server in your region, this will increase decentralization of the network. You can choose your preferred operating system, though we highly recommend Linux.

**Hardware requirements**

Use the charts below to find the basic configuration, which guarantees that all blocks can process in time. If the hardware doesn't meet these requirements, there is a high chance it will malfunction and you risk be automatically **kicked out and slashed** from the active set.

{% hint style="info" %}
**CAUTION**

Make sure your server is a **bare metal only dedicated to the validator node**, any unnecessary other process running on it will significantly decrease the validator performance. **We strongly discourage using a VPS** to run a validator because of their low performances.
{% endhint %}

Validator are the nodes which require the most powerful and fast machine, because they only have a very short time frame to assemble and validate it. To run a validator, it is absolutely necessary to use a **CPU of minimum 4 Ghz per core,** a **NVMe SSD disk** (SATA SSD are not suitable for validator because they are too slow) and 2 x RTX 4090 (or similar)

| Component | Min. requirement                  |
| --------- | --------------------------------- |
| System    | Ubuntu 22.04                      |
| CPU       | 12 cores - minimum 4 Ghz per core |
| Memory    | 64 GB                             |
| Hard Disk | 1 TB SSD NVMe                     |
| GPU       | 2 x RTX 4090 (or equivalent)      |


# Spin up a validator

{% hint style="warning" %}
**CAUTION**

Validators are responsible for the network stability, it is very important to be able to react at any time of the day or night in case of trouble. We strongly encourage validators to set up a monitoring and alerting system, learn more about this from our secure setup guide.
{% endhint %}

### Start the AI Service

#### Prerequisite

Must have conda installed, follow the instruction [here](https://docs.conda.io/projects/conda/en/latest/user-guide/install/index.html#).

Clone the [uomi-node-ai](https://github.com/Uomi-network/uomi-node-ai/) repo

### Installation Steps

#### 1. Set up Conda Environment

First, open a terminal and create a new conda environment:

```bash
conda create -n uomi-ai python=3.10 -y
```

If you've just installed Miniconda/Anaconda, initialize conda in your shell:

```bash
# For bash users
source ~/miniconda3/etc/profile.d/conda.sh
# For zsh users
source ~/miniconda3/etc/profile.d/conda.sh

# Activate the environment
conda activate uomi-ai
```

#### 2. Install PyTorch with CUDA Support

Install PyTorch and related packages:

```bash
conda install pytorch==2.2.0 torchvision==0.17.0 torchaudio==2.2.0 pytorch-cuda=12.1 -c pytorch -c nvidia
```

Verify the installation:

```bash
python -c "import torch; print(torch.cuda.is_available())"
```

This should print `True` if CUDA is properly installed.

#### 3. Install CUDA Development Tools

Install CUDA toolkit and NVCC compiler:

```bash
conda install -c nvidia/label/cuda-12.1.0 cuda-nvcc=12.1 cuda-toolkit=12.1
```

Verify the installation:

```bash
nvcc --version
```

#### 4. Install Additional Dependencies

Install the required Python packages:

```bash
# Install Optimum
pip install -U "optimum>=1.20.0"

# Install AutoGPTQ
pip install auto-gptq --no-build-isolation

# Install Transformers
pip install transformers

# Install specific NumPy version
conda install numpy=1.24

# Install Flash Attention
pip install flash-attn --no-build-isolation

# Install Flask
pip install flask
```

### Troubleshooting

#### Common Issues

1. **CUDA Not Found**
   * Verify NVIDIA drivers are installed: `nvidia-smi`
   * Check CUDA installation: `nvcc --version`
   * Ensure PyTorch CUDA is properly installed: `python -c "import torch; print(torch.version.cuda)"`
2. **Build Failures**
   * Ensure you have build tools installed:

     ```bash
     sudo apt-get update
     sudo apt-get install build-essential
     ```
   * For Auto-GPTQ issues, try installing from source:

     ```bash
     git clone https://github.com/AutoGPTQ/AutoGPTQ.git
     cd AutoGPTQ
     rm -rf build/*
     python setup.py install
     ```
3. **Version Conflicts**
   * If you encounter package conflicts, try creating a fresh environment
   * Consider using `pip install --no-deps` for problematic packages

#### Verification

To verify the complete setup, run this test script:

```python
import torch
import transformers
import auto_gptq
import flash_attn
import flask

print(f"PyTorch version: {torch.__version__}")
print(f"CUDA available: {torch.cuda.is_available()}")
print(f"CUDA version: {torch.version.cuda}")
print(f"Transformers version: {transformers.__version__}")
```

### Create the service

1. Create a new systemd service file for the AI component:

```bash
sudo nano /etc/systemd/system/uomi-ai.service
```

2. Add the following content to the service file:

```ini
[Unit]
Description=UOMI AI API Server
After=network.target

[Service]
User=uomi
WorkingDirectory=/home/uomi/uomi-node-ai
ExecStart=/bin/bash -c "source /home/uomi/miniconda3/etc/profile.d/conda.sh && conda activate uomi-ai && python3 uomi-ai.py"
Restart=always
RestartSec=10
TimeoutSec=30
StartLimitIntervalSec=500
StartLimitBurst=5

[Install]
WantedBy=multi-user.target
```

**Important Notes:**

* The `WorkingDirectory` path (`/home/uomi/uomi-node-ai`) should be adjusted to match your actual installation directory
* The `ExecStart` command assumes:
  * Miniconda is installed in `/home/uomi/miniconda3`
  * A conda environment named `uomi-ai` exists
  * The main Python script is named `uomi-ai.py`
* Modify these paths and names according to your specific setup

3. Enable and start the AI service:

```bash
sudo systemctl daemon-reload
sudo systemctl enable uomi-ai.service
sudo systemctl start uomi-ai.service
```

4. Verify the service is running:

```bash
sudo systemctl status uomi-ai.service
```

5. Monitor the AI service logs:

```bash
sudo journalctl -u uomi-ai.service -f
```

## Set-up the validator Node

### Download the binary

Make sure to download the uomi bin and genesis file on your machine from: <https://github.com/Uomi-network/uomi-node/releases/latest>

### Directory Structure Setup

Create the necessary directories and set appropriate permissions:

```bash
# Create directories
sudo mkdir -p /var/lib/uomi
sudo mkdir -p /usr/local/bin

# Create user for the service
sudo useradd --no-create-home --shell /usr/sbin/nologin uomi

# Set permissions
sudo chown -R uomi:uomi /var/lib/uomi
```

### Binary and Genesis Setup

Get available peers at <https://app.uomi.ai/peers>

Add copied peers inside the genesis.json file:

```json
{
  "name": "Uomi",
  "id": "uomi",
  "chainType": "Live",
  "bootNodes": [PASTE_PEERS_ARRAY_HERE],
 "telemetryEndpoints": null,
  "protocolId": null,
  "properties": {
    "tokenDecimals": 18,
    "tokenSymbol": "UOMI"
  },
...
```

Then install binary and genesis files:

1. Copy the Uomi binary to the correct location:

```bash
sudo cp ./uomi /usr/local/bin/uomi
sudo chmod +x /usr/local/bin/uomi
```

2. Copy the genesis file:

```bash
sudo cp ./genesis.json /usr/local/bin/genesis.json
```

#### Create validator account <a href="#service-parameters" id="service-parameters"></a>

This account is the one that will validate blocks and will save output from Agents

```
/usr/local/bin/uomi key generate --scheme Sr25519
```

You will get something like:

```
Secret phrase:     tackle rebuild neither turn degree real capital armed giraffe novel resist human
Network ID:        substrate
Secret seed:       0x5c9499827e606bcf284e8a650a96ce13ebf0484bd64a280507ff96d99da6e174
Public key (hex):  0x14ceec080a6aa464b4235dd951a85669d25e4fa659578f01a7a7dc5c95454931
Account ID:        0x14ceec080a6aa464b4235dd951a85669d25e4fa659578f01a7a7dc5c95454931
Public key (SS58): 5CXzHQ3DmYKemRAyY6NPyKsDWiChbeeKtxW3q5RWpmdUQvdR
SS58 Address:      5CXzHQ3DmYKemRAyY6NPyKsDWiChbeeKtxW3q5RWpmdUQvdR
```

Generate Ed25519 key for GRANDPA using the same seed phrase:

```bash
/usr/local/bin/uomi key inspect --scheme Ed25519 "YOUR_SEED_PHRASE"
```

you'll need the secret phrase and the secret seed later.

{% hint style="warning" %}
**CAUTION**

Save your secret phrase and secret seed in a safe place (preferably offline), it's the only way to recover your account if you lose it
{% endhint %}

### Systemd Service Configuration

Create a systemd service file at `/etc/systemd/system/uomi.service`:

```ini
iniCopy[Unit]
Description=Uomi Node
After=network.target
StartLimitIntervalSec=0

[Service]
Type=simple
User=uomi
Group=uomi
Restart=always
RestartSec=10
LimitNOFILE=65535
ExecStart=/usr/local/bin/uomi \
    --validator \
    --name "YOUR_NODE_NAME" \
    --chain "/usr/local/bin/genesis.json" \
    --base-path "/var/lib/uomi" \
    --state-pruning 1000 \
    --blocks-pruning 1000 \
    --enable-evm-rpc \
    --rpc-cors all \
    --prometheus-external \
    --telemetry-url "wss://telemetry.polkadot.io/submit/ 0"

# Hardening
ProtectSystem=strict
PrivateTmp=true
PrivateDevices=true
NoNewPrivileges=true
ReadWritePaths=/var/lib/uomi

[Install]
WantedBy=multi-user.target
```

### Enable and start the service:

```bash
sudo systemctl daemon-reload
sudo systemctl enable uomi.service
sudo systemctl start uomi.service
```

### Add your key to your node

Once your node is running, insert your keys:

{% hint style="warning" %}
**ATTENTION**\
Replace ***SECRET\_PHRASE*** and ***PUBLIC\_KEY*** with your data received with the first command "key generate **--scheme Sr25519**"
{% endhint %}

```bash
for key_type in babe imon uomi ipfs; do
    curl -H "Content-Type: application/json" \
        -d '{"id":1, "jsonrpc":"2.0", "method":"author_insertKey", "params":["'$key_type'", "SECRET_PHRASE", "PUBLIC_KEY"]}' \
        http://localhost:9944
done
```

{% hint style="warning" %}
**ATTENTION**\
Replace ***SECRET\_PHRASE*** and ***PUBLIC\_KEY*** with your data received with the first command "key inspect **--scheme Ed25519**"
{% endhint %}

```bash
curl -H "Content-Type: application/json" \
    -d '{"id":1, "jsonrpc":"2.0", "method":"author_insertKey", "params":["gran", "SECRET_PHRASE", "PUBLIC_KEY"]}' \
    http://localhost:9944
```

This data will be stored on your local node, no one can have access to them.

### Add the account  <a href="#verify-synchronization" id="verify-synchronization"></a>

Now you can import the account you created previously with SECRET\_PHRASE to your wallet extension and fund it with the tokens you want to bond

#### Verify synchronization[​](https://docs.astar.network/docs/build/nodes/collator/spinup_collator#verify-synchronization) <a href="#verify-synchronization" id="verify-synchronization"></a>

Before jumping to the next steps, you have to wait until your node is **fully synchronized**. This can take a long time depending on the chain height.

Check the current synchronization:

```
journalctl -f -u uomi -n100
```

### Session Keys[​](https://docs.astar.network/docs/build/nodes/collator/spinup_collator#session-keys) <a href="#session-keys" id="session-keys"></a>

**Author session keys**[**​**](https://docs.astar.network/docs/build/nodes/collator/spinup_collator#author-session-keys)

Run the following command to author session keys:

```bash
curl -H "Content-Type: application/json" -d '{"id":1, "jsonrpc":"2.0", "method": "author_rotateKeys", "params":[]}' http://localhost:9944
```

The result will look like this (you just need to copy the result):

```
{"jsonrpc":"2.0","result":"0x600e6cea49bdeaab301e9e03215c0bcebab3cafa608fe3b8fb6b07a820386048","id":1}
```

**Register as validator**

Go to the [Polkadot.js portal](https://subexp.uomi.ai) and connect to the network.

Go to ***Network > Staking > Accounts*** and then select **Validator** on the right&#x20;

<figure><img src="/files/OIAMmSbnADRLvkY80djz" alt=""><figcaption></figcaption></figure>

Select the account you funded previously, the amount you want to bond and the payment method and click **next.**

Now insert the key you copied before and follow the instructions, click "bond & validate" and then submit the transaction.

{% hint style="info" %}
**INFO**\
Onboarding takes place at `n+1` session.
{% endhint %}

You can now [set your identity](/build/run-a-node/become-a-validator/set-your-identity).&#x20;


# Set your identity

This section will guide you through the process of attaching real-world information to your Uomi account.

When you are a validator, you care for your credibility and recognizability as seen by potential nominators. One way of ensuring the trustworthiness of your account is attaching some real-world information to your account, including the display name, email, website, etc.

#### Set basic information

Go on the [polkadot.js app](https://subexp.uomi.ai), connect your validator wallet (created as first step in [Spin up a validator](/build/run-a-node/become-a-validator/spin-up-a-validator)).

Go to **Developer > extrinsics.**

Select **your validator account** and **identity > setIdentity** as extrinsic type

<figure><img src="/files/ido8RHRimXAEjGoxZ5w5" alt=""><figcaption></figcaption></figure>

The default info are:

| Name    | data                                           |
| ------- | ---------------------------------------------- |
| Display | Name displayed on-chain when validating blocks |
| Legal   | Legal name                                     |
| Web     | Website                                        |
| Riot    | Element username                               |
| Email   | E-mail address                                 |
| Image   | Validator image                                |
| Twitter | Twitter link/username                          |

You don't need to fill up everything, just leave as "None" whatever you don't want to share.

When you chose something to add, click "None" and select "Raw", write the information

Then click sign **Sumbit transaction** and send

#### Custom information

By clicking "Add new item" you can add custom information (up to 100 custom information), filling up firstly the name, then the data


# Build an Agent


# Introduction

### WASP

WASP (WebAssembly Agent System Platform) is a comprehensive development environment created by the UOMI team for building, testing, and deploying WebAssembly agents. It provides a simulation environment that mirrors the UOMI blockchain's behavior, allowing developers to create and test agents in a controlled environment before deployment.

#### Key Features

* WebAssembly-based agent execution
* Blockchain node simulation
* Built-in debugging capabilities
* Frontend integration tools
* Hot-reloading development environment

### Architecture Overview

WASP implements a three-layer architecture:

1. **Host Layer** - Simulates blockchain node behavior
2. **Agent Layer** - Contains the WebAssembly agent code
3. **Frontend Layer** - Provides user interface and interaction

#### Communication Flow

```
Frontend (main.js) <-> Host Simulation <-> WebAssembly Agent
```

### Project Structure

```
Copywasp-project/
├── host/                 # Blockchain node simulation
├── agent-template/       # Agent development environment
|   └── src/                
│      ├── lib/             # Core agent functionality
│      ├── utils/           # Utility functions
│                
└── main.js              # User interface 
```


# Development

#### Host Environment (`/host`)

The host directory contains the blockchain node simulation environment. This is a critical component that should never be modified as it represents the actual blockchain behavior.

```
⚠️ WARNING: The host directory simulates blockchain node behavior.
Modifying its contents may lead to inconsistent behavior between
development and production environments.
```

#### Agent Development (`/agent-template`)

**Core Files**

* **lib.rs**: Core agent logic
* **utils.rs**: Utility functions and blockchain interactions

**Protected Functions**

The utils.rs file contains essential offchain API functions that must not be modified. These are marked with a specific comment block:

```rust
// ===========================================================
// =============== Offchain API, DO NOT MODIFY ===============
// ===========================================================
```

These functions provide core functionality for:

* Blockchain communication
* Logging and debugging
* Memory management
* Security operations


# Installing WASP

WASP (WebAssembly Agent System Platform) is available on GitHub on [GitHub official WASP repo](https://github.com/Uomi-network/WASP). This guide will walk you through the installation process and get you started with WASP development.

### Prerequisites

Before installing WASP, ensure your system meets the following requirements:

1. **Rust**
   * Latest stable version of Rust
   * Install from <https://rustup.rs/>
2. **Node.js**
   * Version 14 or higher
   * Download from <https://nodejs.org/>
3. **WebAssembly Target**

   * Required for compiling Rust to WebAssembly
   * Install using rustup:

   ```bash
   rustup target add wasm32-unknown-unknown
   ```

### Installation Methods

You have two options for installing and setting up WASP:

#### Option 1: Quick Start with NPX (Recommended)

This is the fastest way to get started with a new WASP project:

```bash
# Create a new UOMI agent project
npx wasp create
```

This command will:

* Create a new project directory
* Set up the required project structure
* Install necessary dependencies
* Configure the development environment

#### Option 2: Manual Setup

If you prefer more control over the setup process, you can manually clone and configure the project:

1. Clone the repository:

```bash
git clone https://github.com/Uomi-network/uomi-chat-agent-template.git
```

2. Navigate to the agent directory:

```bash
cd uomi-chat-agent-template/agent
```

3. Install dependencies:

```bash
npm install
```

4. Make the build script executable:

```bash
chmod +x ./bin/build_and_run_host.sh
```

5. Start the development environment:

```bash
npm start
```

### Verifying Installation

To verify that WASP is installed correctly:

1. Start the development environment:

```bash
npm start
```

2. You should see the UOMI Development Environment interface:

```
UOMI Development Environment
Type your messages. Use these commands:
/clear - Clear conversation history
/history - Show conversation history
/exit - Exit the program
```

## Available AI Models

Available AI models can be found in the [Models page](/build/build-an-agent/available-ai-models), using different IDs in the call\_ai\_service call will cause the agent to crash and not work

### Next Steps

After installation, you should:

1. Configure your development environment in `uomi.config.json`
2. Set up your AI model preferences (local node-ai or third-party services)
3. Familiarize yourself with the project structure
4. Try running the example agent

### AI Service Configuration

You have two options for AI service integration:

#### Option 1: Local Node-AI Service (Recommended)

Follow the [node-ai repository setup](https://github.com/Uomi-network/uomi-node-ai) to run the production version locally. With this option, you don't need to specify URL or API keys in your configuration.

#### Option 2: Third-Party Services

If you prefer using external services like OpenAI (This method does not guarantee determinism as the model result in tests, the model result may be different from the one in production), configure your `uomi.config.json`:

```json
{
  "models": {
    "1": {
      "name": "gpt-3.5-turbo",
      "url": "https://api.openai.com/v1/chat/completions",
      "api_key": "your-api-key-here"
    }
  }
}
```

### Troubleshooting

If you encounter issues during installation:

1. **Rust Build Failures**
   * Verify your Rust installation: `rustc --version`
   * Ensure WebAssembly target is installed: `rustup target list`
2. **Node.js Issues**
   * Check Node.js version: `node --version`
   * Verify npm installation: `npm --version`
3. **Permission Issues**
   * Ensure build script is executable
   * Check filesystem permissions

### Getting Help

If you need assistance:

* Check the [GitHub repository](https://github.com/Uomi-network/WASP)
* Submit issues for bugs or questions
* Contribute via pull requests

***

WASP is an open-source project maintained by the UOMI team. For additional support or information, refer to the project documentation or reach out to the community.


# Agents API Reference

### Overview

UOMI provides a set of high-level API functions that wrap the low-level WebAssembly calls, making it easy to develop agents without dealing with memory management and unsafe code. These functions are designed to be safe, efficient, and easy to use.

### Core Functions

#### Logging

**`log(message: &str)`**

Logs a message to the console for debugging purposes.

```rust
pub fn log(message: &str)
```

**Example:**

```rust
fn process_data() {
    log("Starting data processing...");
    // Process data
    log("Data processing completed");
}
```

#### Input/Output Operations

**`read_input() -> Vec<u8>`**

Reads the input data provided to the agent.

```rust
pub fn read_input() -> Vec<u8>
```

**Example:**

```rust
fn handle_request() {
    let input_data = read_input();
    let request = String::from_utf8(input_data).unwrap();
    log(&format!("Received request: {}", request));
}
```

**`save_output(data: &[u8])`**

Saves the agent's output data.

```rust
pub fn save_output(data: &[u8])
```

**Example:**

```rust
fn process_and_save() {
    let result = process_data();
    save_output(result.as_bytes());
    log("Result saved successfully");
}
```

#### File Operations

**`get_input_file_service() -> Vec<u8>`**

Retrieves the content of an input file.

```rust
pub fn get_input_file_service() -> Vec<u8>
```

**Example:**

```rust
fn analyze_file() {
    let file_content = get_input_file_service();
    log(&format!("File size: {} bytes", file_content.len()));
    // Analyze file content
}
```

**`get_cid_file_service(cid: Vec<u8>) -> Vec<u8>`**

Retrieves a file from IPFS using its CID.

```rust
pub fn get_cid_file_service(cid: Vec<u8>) -> Vec<u8>
```

**Example:**

```rust
fn fetch_ipfs_content() {
    let cid = "QmExample...".as_bytes().to_vec();
    let content = get_cid_file_service(cid);
    log(&format!("Retrieved IPFS content: {} bytes", content.len()));
}
```

#### AI Model Integration

**`prepare_request(body: &str) -> Vec<u8>`**

Prepares a request body for AI model interaction.

```rust
pub fn prepare_request(body: &str) -> Vec<u8>
```

**`call_ai_service(model: i32, content: Vec<u8>) -> Vec<u8>`**

Calls an AI model with the prepared request. `Model` can be found on the [Models page](/build/build-an-agent/available-ai-models)

```rust
pub fn call_ai_service(model: i32, content: Vec<u8>) -> Vec<u8>
```

**Example:**

```rust
fn process_with_ai() {
    // Prepare AI request
    let prompt = format!("{{\"messages\": [{\"role\":\"user\",\"content\":\"hey\"}] }}");
    
    let request = prepare_request(prompt);
    
    // Call AI model
    let response = call_ai_service(1, request);
    
    // Process response
    let result = String::from_utf8(response).unwrap();
    log(&format!("AI response: {}", result));
}
```

### Common Usage Patterns

#### Complete Agent Example

```rust
mod utils;

#[no_mangle]
pub extern "C" fn process() {
    // Log start of processing
    log("Starting agent execution");
    
    // Read input
    let input = read_input();
    let input_str = String::from_utf8(input).unwrap();
    log(&format!("Received input: {}", input_str));
    
    // Prepare AI request
     let prompt = format!("{{\"messages\": [{\"role\":\"user\",\"content\":{}] }}", input_str);
    
    // Call AI model
    let ai_response = call_ai_service(1, request);
    let result = String::from_utf8(ai_response).unwrap();
    
    // Save output
    save_output(result.as_bytes());
    log("Agent execution completed");
}
```

#### File Processing Example

```rust
mod utils;

fn process_file_content() {
    // Get file content
    let content = get_input_file_service();
    
    // Process with AI
    let request = prepare_request(format!("{{\"messages\": [{\"role\":\"user\",\"content\":{}] }}", String::from_utf8(content).unwrap()));
    
    let summary = call_ai_service(1, request);
    
    // Save results
    save_output(&summary);
}
```

### Performance Tips

1. **Minimize AI Calls**
   * Use efficient prompts
2. **Optimize Data Handling**
   * Process data in appropriate chunks
   * Avoid unnecessary copies
   * Use efficient data structures
3. **Smart Logging**
   * Remove logs for production agent
   * Avoid logging sensitive data

### Security Considerations

Remember that these functions are part of the protected API and should not be modified. They provide a safe interface to interact with the UOMI blockchain and AI capabilities.


# Available AI Models

## Available AI Models

### Overview

[WASP](https://github.com/Uomi-network/WASP) provides access to cutting-edge AI models through a simple and efficient interface. Each model is carefully selected to offer high-performance.

### Current Model Lineup

|  ID |   Name  |                Model                |      Type      | Parameters |
| :-: | :-----: | :---------------------------------: | :------------: | :--------: |
|  1  | Qwen2.5 | Qwen/Qwen2.5-32B-Instruct-GPTQ-Int4 | Language Model | 32 Billion |

### Detailed Model Insights

#### Qwen2.5-32B-Instruct

The Qwen2.5 model represents the latest advancement in large language model technology. Developed by Alibaba's Qwen team, this model brings several key innovations:

* **High-Performance Instruction Following**: Specifically designed to understand and execute complex instructions with remarkable accuracy.
* **Efficient Quantization**: Utilizing GPTQ (Generative Pretrained Transformer Quantization) with INT4 precision, the model maintains high performance while reducing computational requirements.
* **Broad Capability Range**: Excels in tasks such as:
  * Natural language understanding
  * Text generation
  * Contextual reasoning
  * Multilingual communication

**Technical Specifications**:

* Model Size: 32 Billion parameters
* Quantization: INT4
* Optimization: GPTQ
* Primary Use: Instruction-based AI interactions

### More models coming soon...

***

**Last Updated**: February 2025


# Agent TSS

This guide is ONLY for developers building AGENTS that submit EVM transactions through the UOMI TSS system. It intentionally omits validator / pallet internals. Focus: how you obtain the agent wallet

### 1. What is TSS?

Multiple network participants collectively hold shares of an ECDSA (secp256k1) key. No single machine has the full private key. When your agent asks to send a transaction, the network collaborates to produce a normal Ethereum-compatible signature. You just supply transaction parameters in a JSON action; the system handles signing.

### 2. Your Agent Wallet (Public Key → Address)

After a Distributed Key Generation (DKG) round completes, an aggregated secp256k1 public key is stored on-chain and associated with your agent (via the session / NFT context). You need its Ethereum address:

1. Listen for a `DKGCompleted(session_id, aggregated_pubkey_bytes)` event (or query historical events / storage if you missed it).
2. Public key is uncompressed (65 bytes) or already stripped; if it starts with 0x04 drop that prefix.
3. Compute: `address = keccak256(pubkey_x_y_bytes)[12..]` (last 20 bytes) → 0x-prefixed H160.

Rust utility example:

```rust
use tiny_keccak::{Hasher, Keccak};
fn eth_address_from_uncompressed(pk: &[u8]) -> [u8;20] { // pk: 65 or 64 bytes
    let raw = if pk.len() == 65 && pk[0] == 0x04 { &pk[1..] } else { pk }; // expect 64 bytes now
    let mut keccak = Keccak::v256();
    keccak.update(raw);
    let mut out = [0u8;32];
    keccak.finalize(&mut out);
    let mut addr = [0u8;20];
    addr.copy_from_slice(&out[12..]);
    addr
}
```

TypeScript example:

```ts
import { keccak256 } from 'viem';
function ethAddressFromUncompressed(pub: Uint8Array): `0x${string}` {
  const raw = (pub.length === 65 && pub[0] === 0x04) ? pub.slice(1) : pub; // 64 bytes
  const hash = keccak256(raw as any); // returns 0x + 64 hex chars
  return ('0x' + hash.slice(-40)) as `0x${string}`;
}
```

Store / cache this address. Use it as `from` when you want explicit gas estimation or RPC nonce fallback.

### 3. Minimal Action JSON

You output a single JSON object containing an `actions` array. Each transaction is an element:

```json
{
  "actions": [
    {
      "action_type": "multi_chain_transaction",
      "chain_id": 4386,
      "data": "0x",
      "to": "0x000000000000000000000000000000000000dead",
      "value": "0x0"
    }
  ],
  "response": "any text your agent wants to say"
}
```

Only `actions` is parsed for execution. `response` (and any other extra top‑level fields) is ignored by the TSS logic.

### 4. Action Fields (What You Usually Need)

Required:

* `action_type`: "multi\_chain\_transaction"
* `chain_id`: target chain (see table below)
* `data`: hex call data (use "0x" for empty)

Common optional:

* `to`: destination (include for normal calls / transfers)
* `value`: hex or decimal string; default 0
* `from`: agent wallet address (recommended – improves gas / nonce inference)
* `tx_type`: "eip1559" (default) or "legacy"
* `max_fee_per_gas` / `max_priority_fee_per_gas`: for EIP‑1559 fine tuning
* `gas_limit`: let system estimate unless you have a known requirement
* `gas_price`: only for legacy OR as a fallback baseline
* `nonce`: almost never set manually – see next section

### 5. Nonces (Keep It Simple)

Priority order inside the system:

1. Explicit `nonce` you provide
2. Internally allocated windowed nonce (**preferred default**)
3. RPC account nonce (if `from` is supplied and internal allocation not used)
4. Fallback 0

Recommendation: **DO NOT** set `nonce` unless you are coordinating multi‑agent sequencing. Let the system allocate; it preserves ordering and handles gaps. If a tx stalls (e.g. low gas) the system may queue empty fillers to advance—your only action might be to re‑emit a higher fee transaction if desired.

### 6. Gas Strategy

* Provide neither `gas_limit` nor fees → system fetches gas price / estimates gas (fallbacks: 1 gwei, 21,000).
* For EIP‑1559 pass `max_fee_per_gas` & `max_priority_fee_per_gas`; omit `gas_price`.
* For simple value transfers default estimates are fine.

### 7. Supported Chains

| Chain               | ID    |
| ------------------- | ----- |
| Ethereum            | 1     |
| Binance Smart Chain | 56    |
| Polygon             | 137   |
| Avalanche           | 43114 |
| Arbitrum            | 42161 |
| Optimism            | 10    |
| Fantom              | 250   |
| Uomi                | 4386  |
| Base                | 8453  |

### 8. Example With EIP‑1559 Fees

```json
{
  "actions": [
    {
      "action_type": "multi_chain_transaction",
      "chain_id": 1,
      "to": "0x000000000000000000000000000000000000dead",
      "data": "0x",
      "max_fee_per_gas": "0x77359400",
      "max_priority_fee_per_gas": "0x3b9aca00",
      "value": "0x0"
    }
  ],
  "response": "burn scheduled"
}
```

### 9. Quick Checklist Before Emitting an Action

* Have you derived & stored the agent address from the aggregated public key?
* Are you using the correct `chain_id`?
* Is `data` a hex string with 0x prefix? (Use "0x" if empty.)
* Avoid manual `nonce` unless absolutely necessary.
* Provide EIP‑1559 fee fields or none (let defaults) – but not both `gas_price` and EIP‑1559 fields.

### 10. Troubleshooting

| Symptom                      | Likely Cause             | Fix                                        |
| ---------------------------- | ------------------------ | ------------------------------------------ |
| Tx never mined               | Underpriced gas          | Resubmit with higher fee fields            |
| Repeated nonce errors        | Manual nonce conflict    | Remove explicit nonce, let system allocate |
| Gas estimation fallback used | Missing `from`           | Include `from` address                     |
| Address mismatch in UI       | Incorrect pubkey hashing | Ensure 0x04 prefix removed before keccak   |

That’s all you need as an agent developer. Internals (storage maps, offchain workers, filler logic) are intentionally abstracted away.

***

### Appendix: (For the Curious)

This section is OPTIONAL reading. It gives extra context about how the underlying threshold ECDSA system works, why threshold selection matters, what happens during a reshare, and how core storage items relate. You do NOT need this to build basic agents, but it can help you reason about edge cases and design choices.

#### A. DKG (Distributed Key Generation) – High Level

Goal: Generate a secp256k1 public key without any single participant ever constructing the corresponding private scalar.

Typical (abstracted) flow:

1. Participant Set: An authority set of size n is fixed for the round.
2. Polynomial Commitments: Each participant samples a secret polynomial f\_i(x) of degree t-1. The secret share intended for participant j is f\_i(j). Commitments (e.g. elliptic curve points g^{f\_i(k)}) are broadcast so others can verify consistency.
3. Share Distribution: Encrypted / authenticated channels deliver shares f\_i(j) to each participant j.
4. Verification: Each participant checks that received shares match the published commitments. Invalid senders can be flagged (offence reporting).
5. Aggregation: Each participant sums all valid shares received (including its own) to obtain its final private share s\_j. The global secret key s = Σ\_i f\_i(0) never exists explicitly; each s\_j is just one additive component of s.
6. Public Key: The aggregated public key is computed as G^{s} (secp256k1 point) by aggregating public commitments; stored on-chain as the agent’s key.

Signing later uses an interactive threshold ECDSA protocol (nonce generation + partial signature shares -> combination). The chain only ever sees a standard ECDSA signature.

#### B. Reshare (Dynamic Participation)

When validators leave/enter or you want to adjust n (while keeping/rotating the key):

1. Trigger: Governance / session transition initiates a new DKG session with updated participant set.
2. Old vs New Key:

* Key Rotation: A brand new aggregated key replaces the previous one (most secure; breaks continuity of address).
* Key Continuation (if supported): Some schemes allow resharing the SAME underlying secret s without changing the public key by running a resharing protocol that maps old shares to new shares. (If your implementation performs a fresh DKG every time, you simply get a new key.)

3. Superseding: Previous completed sessions are marked superseded in storage; new session may copy forward the aggregated key if continuity is intended (seen in code path that re-inserts previous aggregated key into a new session if not rotating).
4. Threshold t-of-n Still Applies: Both signing AND (if supported) resharing correctness require ≥ t honest active participants from the initial key generation round — e.g. if the initial `t=3`, then we need at least `3` participants from the previous key generation in order to reshare the key with new participants. Keep in mind that this is evaluated in sequence, so assuming we have `t` and `n` fixed to 3 and 5 then it means that we will still need `3-of-5` **previous** participants in order to succesfully reshare the key.&#x20;

Threshold Choice Guidance:

* Security increases with higher t (attacker must compromise more shares).
* Liveness decreases with higher t (harder to gather enough partial signatures during network churn/outages).
* Recommended: 60–70% of n (e.g. for n=10 → t=7). Avoid >80% because then your agent's wallet would be subject to possibly a malicious attack in which 20% of the validators might cut your wallet out of the system.

Rule of Thumb:

```
if t < 0.6n -> elevated collusion risk
if 0.6n <= t <= 0.7n -> balanced
if t > 0.8n -> liveness hazard under churn
```

#### C. Core Storage (Conceptual)

Not exhaustive—just the parts relevant to multi-chain signing:

* `DkgSessions` – Tracks state of each DKG session (in progress, complete, superseded).
* `AggregatedPublicKeys` – Maps `SessionId` -> aggregated secp256k1 public key bytes. Use most recent non-superseded session for the wallet address.
* `SigningSessions` – Active threshold signing rounds (each linked to a request / message preimage). Contains who has provided what, partial signature collection state, etc.
* `NonceStates` – Per (Agent NFT, ChainID) nonce allocation window (sequential ordering + acceptance pruning).
* `PendingTssOffences` (and related) – Reported misbehavior (e.g. invalid shares, protocol deviations) queued for resolution / slashing logic elsewhere.

#### D. Threshold vs Operational Risks

Choosing t too low:

* Faster signing under partial outages.
* Increased probability that a small colluding subset can forge signatures.

Choosing t too high:

* Resilience against compromise.
* Greater chance a few offline nodes stall all signing or resharing → backlog of pending nonces → potential gap filler churn.

Mitigation Strategies:

* Track historical uptime before lowering t.
* Introduce adaptive fee bump logic off-chain (agent side) if mempool congestion persists.
* Periodic resharing to evict chronically unreliable participants.

#### E. Failure & Recovery (Example Scenarios)

Scenario: Participant goes offline mid-signing.

* If remaining online signers ≥ t → signature completes normally.
* If < t → signing session stalls; agent should avoid spamming retries—wait for reshare or participant recovery.

Scenario: Stuck Low-Gas Transaction.

* Internal nonce window blocks subsequent higher nonces.
* Submit replacement with higher fee (same nonce) OR rely on filler after detection of prolonged gap.

Scenario: Chain RPC Failures.

* Gas price and nonce fallback to default heuristics (1 gwei, 21k, 0 if allocation unreachable).
* Consider explicitly setting fees during known RPC instability.

#### F. Security At a Glance

* Secret never reconstructed; only signatures leak derived info (standard ECDSA security assumptions).
* Share compromise threshold: An attacker needs ≥ t valid shares simultaneously.
* Replay protection: Nonce tracking + enforcement of contiguous acceptance prevents reordering or skipping.

#### G. Practical Checklist for Threshold Tuning (Add-On)

| Metric                            | Observe  | Action                                                       |
| --------------------------------- | -------- | ------------------------------------------------------------ |
| Avg signer availability           | < 85%    | Lower t slightly or remove bad actors                        |
| Stalled signing sessions per week | > 2      | Investigate network latency / raise fee bump policy          |
| Reported offences                 | Frequent | Trigger resharing, re-evaluate membership                    |
| Filler (gap) tx frequency         | High     | Tune gas limits / pricing strategy; investigate stuck nonces |

#### H. Glossary (Quick)

* DKG – Distributed protocol to create a shared public key.
* Reshare – Refresh participant set / shares (with or without rotating key).
* t-of-n – Threshold number t of total participants n required to sign.
* Share – A participant’s fragment of the secret scalar.
* Aggregated Public Key – secp256k1 point derived from commitments; defines agent’s EVM address.
* Signing Session – One threshold signature production workflow for a message / transaction preimage.